The sixth month of the Udacity Self-Driving Car Engineer Nanodegree Program teaches students about control. Control is how we actually turn the steering wheel or press the pedals to get the car to follow a trajectory, and the algorithms that perform this work are called “controllers”.
Two of the most common controllers for automotive applications are proportional-integral-derivative (PID) controllers and model predictive controllers (MPC). These are the two controllers we teach in the Udacity program.
Here are five different approaches Udacity students have taken to build controllers that drive the Udacity self-driving car around our simulator!
Andrey’s YouTube video simply mentions that his PID controller automatically learns hyperparameters. It looks like Andrey ran his car around the track multiple times and used some version of coordinate descent (the formal name for Sebastian’s Twiddle algorithm) to automatically tune the parameters.
“Implemented PID controller with automatically learned hyperparameters in C++ which allows the car learns to drive itself from scratch in the simulator.”
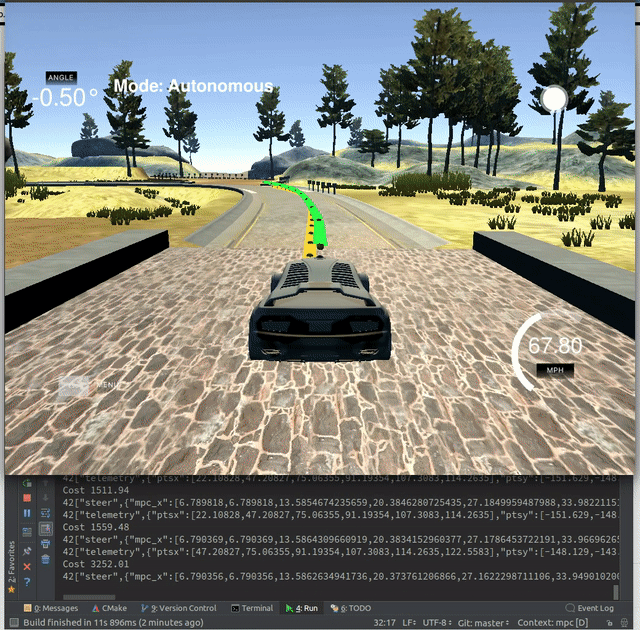
Anupriya talks about a number of the complications she encountered in developing her model predictive controller, and how she overcame them. Many of these are similar to what autonomous vehicle engineers find when deploying controllers to actual vehicles.
“This project also factors in real world latency that can occur while applying actuator inputs. To simulate this the project’s main thread sleeps for 100ms before sending the actuations to simulator. To account for this while returning the actuations to simulator I use 2 set of actuations — the real actuations for next step and the next predicted actuation after dt which is 0.1 second(100 ms) in my case. Sending the sum of these 2 actuations makes the model proactively apply the next actuation and hence handles the 100ms latency.”
Priya provides a thorough walkthrough of how she built her model predictive controller. If you’re interested in a line-by-line breakdown of how MPC works, this is a great read.
“To estimate the ideal steering angle and throttle, we estimate the error of our new state from our ideal state — actual trajectory we want to follow and the velocity and orientation we want to maintain and use a Ipopt Solver to minimize this error. This helps select the steering and throttle that minimizes the error with the desired trajectory.”
Andrew compares and contrasts PID and MPC, along with a brief review of Term 2 of the Nanodegree Program. He does a nice job of summarizing the different levels of fidelity at which you can build a controller.
“PID controller enables the car (robot) to follow some trajectory (x-axis reference line) while proportionally (how hard to correct steering), differentially (how gradually to return to the reference) and integrally (allow for wheel misalignment) applying the cross track error (CTE). It is simple to code, inexpensive to run (computationally) and takes little tuning effort to get something working. The down-side is that the car moves erratically and cannot accurately handle actuation latency (delay between command send and physical activation) .”
I enjoy the musical selections Jeremy picks to underscore his project submissions, and this one is a lot of fun. The blog post also provides a nice perspective of what it’s like to complete the Udacity MPC project as a student.
“After some debugging and tuning the cost function, my car was making its way around the track. It was time to tear it all down by adding the latency — and that’s just what happened. My approach to dealing with it was twofold (not counting simply limiting the speed): the original kinematic equations depend upon the actuations from the previous time step, but with a delay of 100ms (which happened to be my time step interval) the actuations are applied another time step later, so I altered the equations to account for this.”
The technology honestly seems a little out there right now, but it might be perfectly plausible in a year or two or three. Even today, robots surveil shopping malls.
To me, the most interesting aspect to this is how self-driving cars affect the balance between citizens, criminals, and the police.
I know less about Dubai, but in the US, police often use pretextual traffic stops to investigate more serious crimes. Self-driving cars might take away the pretext for a traffic stop, however, tipping the balance of power away from the police. Self-driving police cars with self-flying drones might tip that balance of power back.
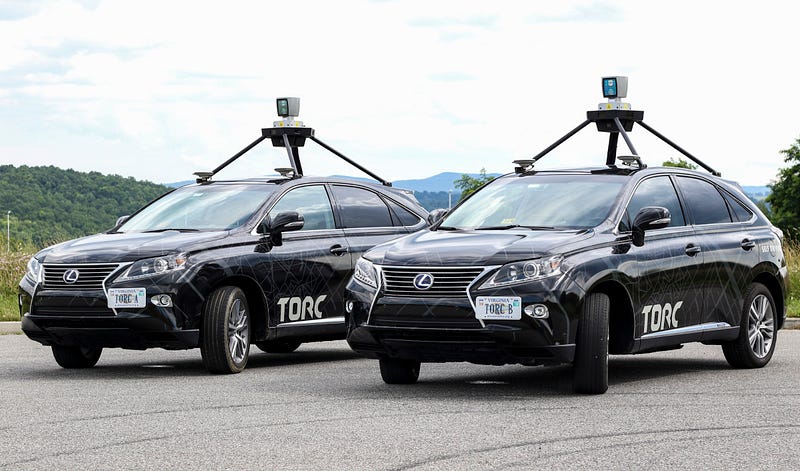
Udacity students often ask if it’s possible to work on self-driving cars outside of Michigan, Germany, and the Bay Area. While those are the current centers of autonomous vehicle development, there are lots of companies in unexpected places around the world working on self-driving cars.
If you’d like to work on self-driving cars and live in Blacksburg, Virginia, (which sounds pretty nice to me) Torc is there for you.
I couldn’t find what I was looking for, so I sat down and sketched out a table myself.
I came across that table recently when I was cleaning up my desk, so I threw it into Google Slides and here it is.
I’m not positive I got every cell in this table correct, as I never ran it by the Mercedes experts. So if you see something wrong here let me know.
But maybe this will be useful to somebody looking for that same comparison table that I never found. And if you know where a better version of that table is, please mention it in the comments.
In just a few days, we‘re going to begin releasing Term 3 of the Udacity Self-Driving Car Engineer Nanodegree Program, and we could not be more excited! This is the final term of a nine-month Nanodegree program that covers the entire autonomous vehicle technology stack, and as such, it’s the culmination of an educational journey unlike any other in the world.
When you complete Term 3 and graduate from this program, you will emerge with an amazing portfolio of projects that will enable you to launch a career in the autonomous vehicle industry, and you will have gained experience and skills that are virtually impossible to acquire anywhere else. Some of our earliest students, like George Sung, Robert Ioffe, and Patrick Kern, have already started their careers in self-driving cars, and we’re going to help you do the same!
Term 3
This term is three months long, and features a different module each month.
The first month focuses on path planning, which is basically the brains of a self-driving car. This is how the vehicle decides where to go and how to get there.
The second month presents an opportunity to specialize with an elective; this is your chance to delve deeply into a particular topic, and emerge with a unique degree of expertise that could prove to be a key competitive differentiator when you enter the job market. We want your profile to stand out to prospective employers, and specialization is a great way to achieve this.
The final month is truly an Only At Udacity experience. In this System Integration Module, you will get to put your code on Udacity’s very own self-driving car! You’ll get to work with a team of students to test out your skills in the real world. We know firsthand from our hiring partners in the autonomous vehicle space that this one of the things they value most in Udacity candidates; the combination of software skills and real-world experience.
Month 1: Path Planning
Path planning is the brains of a self-driving car. It’s how a vehicle decides how to get where it’s going, both at the macro and micro levels. You’ll learn about three core components of path planning: environmental prediction, behavioral planning, and trajectory generation.
Best of all, this module is taught by our partners at Mercedes-Benz Research & Development North America. Their participation ensures that the module focuses specifically on material job candidates in this field need to know.
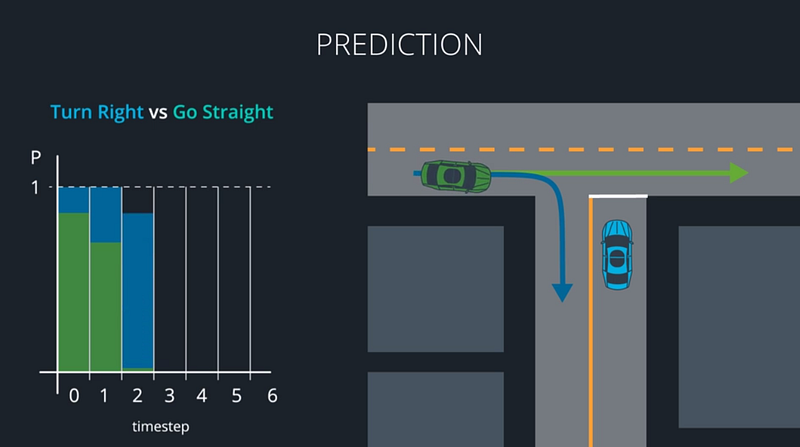
Path Planning Lesson 1: Environmental Prediction
In the Prediction Lesson, you’ll use model-based, data-driven, and hybrid approaches to predict what other vehicles around you will do next. Model-based approaches decide which of several distinct maneuvers a vehicle might be undertaking. Data-driven approaches use training data to map a vehicle’s behavior to what we’ve seen other vehicles do in the past. Hybrid approaches combine models and data to predict where other vehicles will go next. All of this is crucial for making our own decisions about how to move.
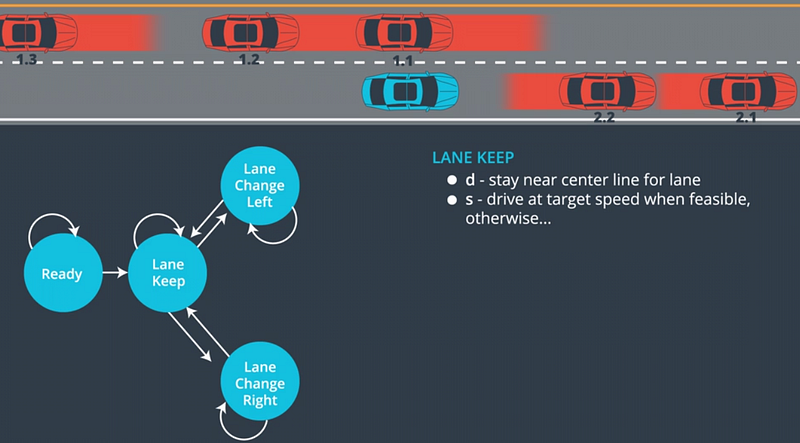
Path Planning Lesson 2: Behavior Planning
At each step in time, the path planner must choose a maneuver to perform. In the Behavior Lesson, you’ll build finite-state machines to represent all of the different possible maneuvers your vehicle could choose. Your FSMs might include accelerate, decelerate, shift left, shift right, and continue straight. You’ll then construct a cost function that assigns a cost to each maneuver, and chooses the lowest-cost option.
Path Planning Lesson 3: Trajectory Generation
Trajectory Generation is taught by Emmanuel Boidot, from Mercedes-Benz’s Vehicle Intelligence team.
In the Trajectory Lesson, you’ll use C++ and the Eigen linear algebra library to build candidate trajectories for the vehicle to follow. Some of these trajectories might be unsafe, others might simply be uncomfortable. Your cost function will guide you to the best available trajectory for the vehicle to execute.
Path Planning Project: Highway Path Planner
Using the newest release of the Udacity simulator, you’ll build your very own path planner and put it to the test on the highway. Tie together your prediction, behavior, and trajectory engines from the previous lessons to create an end-to-end path planner that drives the car in traffic!
Month 2: Electives
Term 3 will launch with two electives: Advanced Deep Learning, and Functional Safety. We’ve selected these based on feedback from our hiring partners, and we’re very excited to give students the opportunity to gain deep knowledge in these topics.
This module covers semantic segmentation, and inference optimization. Both of these topics are active areas of deep learning research.
Semantic segmentation identifies free space on the road at pixel-level granularity, which improves decision-making ability. Inference optimizations accelerate the speed at which neural networks can run, which is crucial for computational-intense models like the semantic segmentation networks you’ll study in this module.
Advanced Deep Learning Lesson 1: Fully Convolutional Networks
In this lesson, you’ll build and train fully convolutional networks that output an entire image, instead of just a classification. You’ll implement three special techniques that FCNs use: 1×1 convolutions, upsampling, and skip layers, to train your own FCN models.
Advanced Deep Learning Lesson 2: Scene Understanding
In this lesson, you’ll learn the strengths and weaknesses of bounding box networks, like YOLO and Single Shot Detectors. Then you’ll go a step beyond bounding box networks and build your own semantic segmentation networks. You’ll start with canonical models like VGG and ResNet. After removing their final, fully-connected layers, you can add the three special techniques you’ve already practiced: 1×1 convolutions, upsampling, and skip layers. Your result will be an FCN that classifies each road pixel in the image!
Advanced Deep Learning Lesson 3: Inference Optimizations
One of the challenges of semantic segmentation is that it requires a lot of computational power. In this lesson, you’ll learn how to accelerate network performance in production, using techniques such as fusion, quantization, and reduced precision.
Advanced Deep Learning Project: Semantic Segmentation
In the project at the end of the Advanced Deep Learning Module, you’ll build a semantic segmentation network to identify free space on the road. You’ll apply your knowledge of fully convolutional networks and their special techniques to create a semantic segmentation model that classifies each pixel of free space on the road. You’ll accelerate the network’s performance using inference optimizations like fusion, quantization, and reduced precision. You’ll be studying and implementing approaches used by top performers in the KITTI Road Detection Competition!
Month 2 Elective: Functional Safety
Together with Elektrobit, we’ve built a fun and comprehensive Functional Safety Module.
You’ll learn functional safety frameworks to ensure that vehicles is safe, both at the system and component levels.
Functional Safety Lesson 1: Introduction
You’ll build a functional safety case with Dheeraj, Stephanie, and Benjamin from Elektrobit.
In this lesson, Elektrobit’s experts will guide you through the high-level steps that the ISO 26262 standard requires for building a functional safety case. ISO 26262 is the world-recognized standard for automotive functional safety. Understanding the requirements of this standard gets you started on mastering a crucial field of autonomous vehicle development.
Functional Safety Lesson 2: Safety Plan
In this lesson, you’ll build a safety plan for a lane-keeping assistance feature. You’ll start with the same template that Elektrobit functional safety managers use, and add the information specific to your feature.
Functional Safety Lesson 3: Hazard Analysis and Risk Assessment
You’ll complete a hazard analysis and risk assessment for the lane-keeping assistance feature. As part of the HARA, you’ll brainstorm how the system might fail, including the operational mode, environmental details, and item usage of each hypothetical scenario. Your HARA will record the issues to monitor in your functional safety analysis.
You’ll translate high-level functional safety concept requirements into technical safety concept requirements that dictate specific performance parameters. At this point you’ll have concrete constraints for the system.
Functional Safety Lesson 6: Software and Hardware
Functional safety includes specific rules on how to implement hardware and software. In this lesson, you’ll learn about spatial, temporal, and communication interference, and how to guard against them. You’ll also review MISRA C++, the most common set of rules for writing C++ for automotive systems.
Functional Safety Project: Safety Case
You’ll use the guidance from your lessons to construct an end-to-end safety case for a lane departure warning feature. You’ll begin with the hazard analysis and risk assessment, and create further documentation for functional and technical safety concepts, and finally software and hardware requirements. Analyzing and documenting system safety is critical for autonomous vehicle development. These are skills that often only experienced automotive engineers possess!
System Integration
System integration is the final module of the Nanodegree program, and it’s the month where you actually get to put your code on the Udacity Self-Driving Car!
You’ll learn about the software stack that runs on “Carla,” our self-driving vehicle. Over the course of the final month of the program, you will work in teams to integrate software components, and get the car to drive itself around the Udacity test track.
Vehicle Subsystems
This lesson walks you through Carla’s key subsystems: sensors, perception, planning, and control. Eventually you’ll need to integrate software modules with these systems so that Carla can navigate the test track.
ROS and Autoware
Carla runs on two popular open-source automotive libraries: ROS and Autoware. In this lesson you’ll practice implementing ROS nodes and Autoware modules.
System Integration
During the final lesson of the program, you’ll integrate ROS nodes and Autoware modules with Carla’s software development environment. You’ll also learn how to transfer the code to the vehicle, and resolve issues that arise on real hardware, such as latency, dropped messages, and process crashing.
Project: Carla
This is the capstone project of the Nanodegree program! You will work with a team of students to integrate the skills you’ve developed over the last nine months. The goal is to build Carla’s software environment to successfully navigate Udacity’s test track.
When you complete Term 3, you will graduate from the program, and earn your Udacity Self-Driving Car Engineer Nanodegree credential. You will be ready to work on an autonomous vehicle team developing groundbreaking self-driving technology, and you will join a rarefied community of professionals who are committed to a world made better through this transformational technology.
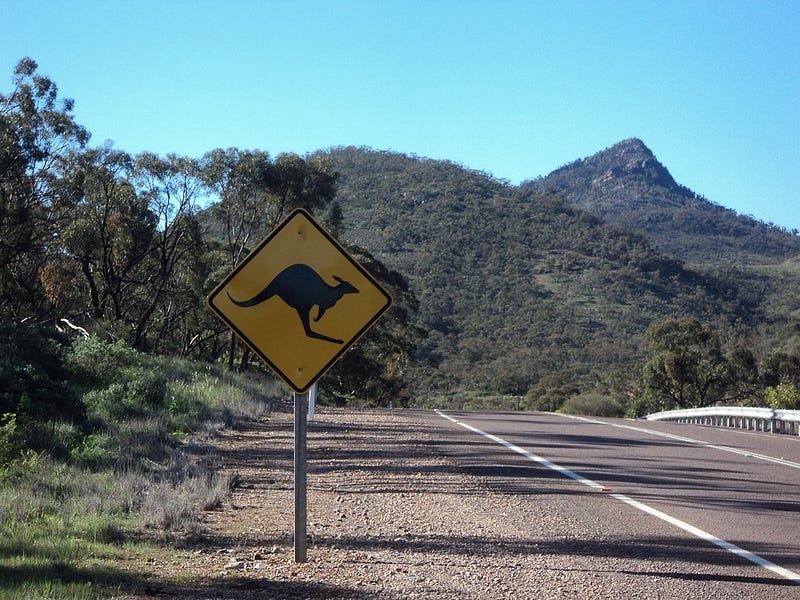
One of the poorly understood complications in autonomous vehicles is how much work will be involved in transferring self-driving technology from one location to another.
Driving in the United States is much different than driving in India, and in fact driving in San Francisco is different than driving in Boston or Peoria. But it’s hard to get a handle on just how big a challenge this will be until we try to transfer self-driving technology to different areas.
Apparently the object detection software for animals is thrown by the way kangaroos hop, which isn’t characteristic of the caribou that Volvo typically sees in Sweden.
“We’ve noticed with the kangaroo being in mid-flight … when it’s in the air it actually looks like it’s further away, then it lands and it looks closer,” Volvo Australia’s technical manager David Pickett said.
Thanks so much to Nate and Aaron and Myles and the entire Autonomous Denver Meetup for hosting me on Tuesday night. And thank you to Uber, for letting us meet in their Louisville, Colorado, office!
It’s always delightful to meet current and potential students and people who are interested in self-driving cars all around the world. This one was special because I love Colorado so much.
Nate arranged for a recording of my presentation about Carla, the Udacity self-driving car, which was awesome. Unfortunately, there were some AV glitches, so the recording comes in two parts and a small portion in the middle was lost.
It was a fun conversation, though, and I hope to be back soon.
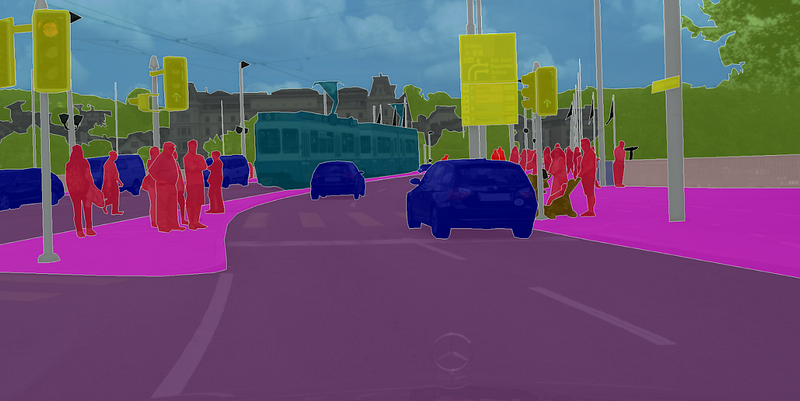
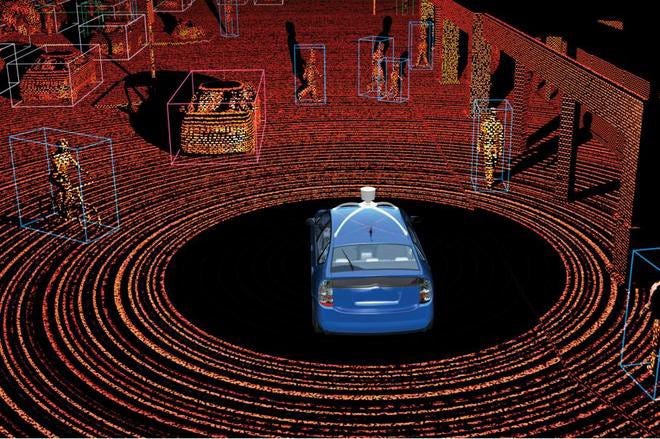
Localization is how a car finds where it is in the world.
It’s tempting to think that localization is an easy problem, since GPS-enabled smartphones are ubiquitous, but localization is actually really hard.
That’s because GPS is only accurate to within about 1 meter. If you think about how big a meter is (about three feet), if a car if off by a meter, it could be driving on the sidewalk, hitting things.
Self-driving cars need single-digit-level localization accuracy. To that end, we used sensor measurements and maps and sophisticated mathematical algorithms to localize the vehicle.
Privya has a terrific description of her localization project, along with a video. Plus, she asks lots of great questions about how to localize in complicated scenarios, which is what we have to deal with in the real world.
“Here is an interesting question? — How would we use this technique for a real self driving car traveling between City A and City B? Particle filters assumes we have a map of the world with known location of many landmarks. How can we determine location of hundreds of landmarks and feed those to the car?”
If you’re looking for a step-by-step walkthrough of the particle filter algorithm, Andrew combines a review of material from the Udacity localization lesson with his own observations.
“Update Weights : These measurements form the weight of each particle by applying the multi-variate gaussian probability density function. This function tells us how likely a set of landmark measurements is given, our predicted state of our car.”