Back when I was trying to break into the autonomous vehicle industry, I applied for a lot of jobs. Including a job “driving” self-driving cars for Google.
I got rejected.
The rules required a clean driving record for the past three years, and 2.5 years prior I had gotten a ticket for talking on a cellphone.
But this is the type of thing you do when you are really excited about changing your career trajectory. You try anything and everything to get close to where you want to be, and the answer always has to be “yes”.
While she is studying to become an autonomous vehicle engineer, Kiki applied to “drive” autonomous vehicles for Cruise. Unlike me, she got the job. And she is learning a ton!
This is not like driving. It is much more like training a driver. You cannot relax and let your driving instincts take over, like driving for a ride sharing company or driving on a commute. You are watching the car drive, and being hyper-alert at all times, in case a human driver acts unpredictably.
How about this?
We’ve had the public throw boxes into the street in front of the car, pretend to roll over the hood as if we’d hit them, try to kick at the sensors, or even just yell at us to go when the car has decided it is still unsafe.
The future seems bright:
There is always room for improvement, and Cruise will be around for a long time, making things better and better, striving always diligently towards unattainable perfection. But they are so far along, and so rapidly improving every day, it’s stunning to watch!
The focus of Term 1 was applying machine learning to automotive tasks: deep learning, convolutional neural networks, support vector machines, and computer vision.
In Term 2, students will build the core robotic functions of an autonomous vehicle system: sensor fusion, localization, and control. This is the muscle of a self-driving car!
Term 2
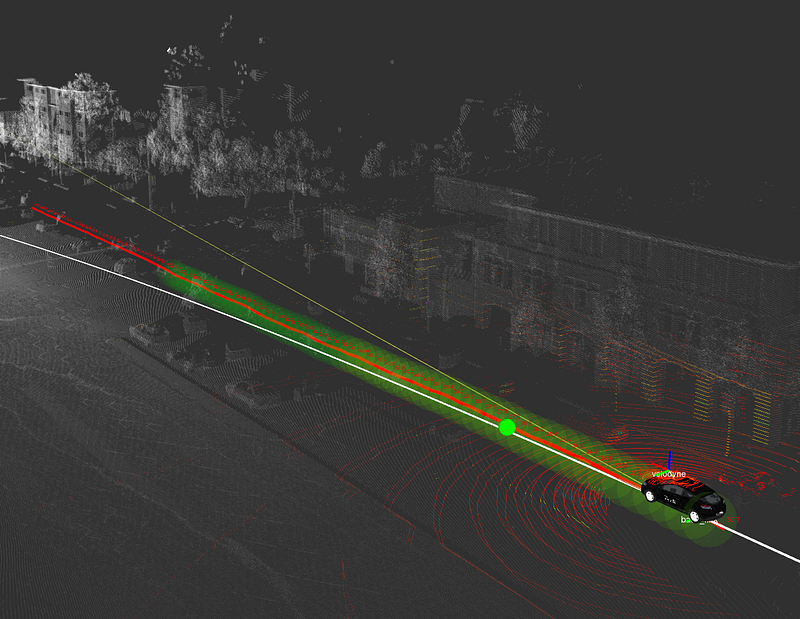
Sensor Fusion
Our terms are broken out into modules, which are in turn comprised of a series of focused lessons. This Sensor Fusion module is built with our partners at Mercedes-Benz. The team at Mercedes-Benz is amazing. They are world-class automotive engineers applying autonomous vehicle techniques to some of the finest vehicles in the world. They are also Udacity hiring partners, which means the curriculum we’re developing together is expressly designed to nurture and advance the kind of talent they would like to hire!
Lidar Point Cloud
Below please find descriptions of each of the lessons that together comprise our Sensor Fusion module:
Sensors The first lesson of the Sensor Fusion Module covers the physics of two of the most import sensors on an autonomous vehicle — radar and lidar.
Kalman Filters Kalman filters are the key mathematical tool for fusing together data. Implement these filters in Python to combine measurements from a single sensor over time.
C++ Primer Review the key C++ concepts for implementing the Term 2 projects.
Project: Extended Kalman Filters in C++ Extended Kalman filters are used by autonomous vehicle engineers to combine measurements from multiple sensors into a non-linear model. Building an EKF is an impressive skill to show an employer.
Unscented Kalman Filter The Unscented Kalman filter is a mathematically-sophisticated approach for combining sensor data. The UKF performs better than the EKF in many situations. This is the type of project sensor fusion engineers have to build for real self-driving cars.
Project: Pedestrian Tracking Fuse noisy lidar and radar data together to track a pedestrian.
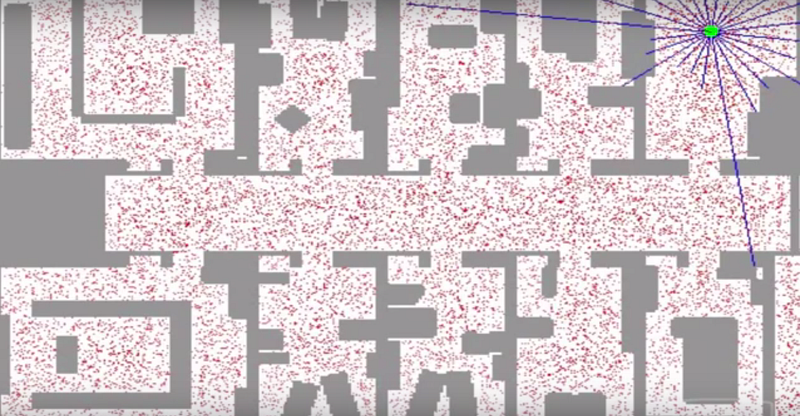
Localization
This module is also built with our partners at Mercedes-Benz, who employ cutting-edge localization techniques in their own autonomous vehicles. Together we show students how to implement and use foundational algorithms that every localization engineer needs to know.
Particle Filter
Here are the lessons in our Localization module:
Motion Study how motion and probability affect your belief about where you are in the world.
Markov Localization Use a Bayesian filter to localize the vehicle in a simplified environment.
Egomotion Learn basic models for vehicle movements, including the bicycle model. Estimate the position of the car over time given different sensor data.
Particle Filter Use a probabilistic sampling technique known as a particle filter to localize the vehicle in a complex environment.
High-Performance Particle Filter Implement a particle filter in C++.
Project: Kidnapped Vehicle Implement a particle filter to take real-world data and localize a lost vehicle.
Control
This module is built with our partners at Uber Advanced Technologies Group. Uber is one of the fastest-moving companies in the autonomous vehicle space. They are already testing their self-driving cars in multiple locations in the US, and they’re excited to introduce students to the core control algorithms that autonomous vehicles use. Uber ATG is also a Udacity hiring partner, so pay attention to their lessons if you want to work there!
Here are the lessons:
Control Learn how control systems actuate a vehicle to move it on a path.
PID Control Implement the classic closed-loop controller — a proportional-integral-derivative control system.
Linear Quadratic Regulator Implement a more sophisticated control algorithm for stabilizing the vehicle in a noisy environment.
Project: Lane-Keeping Implement a controller to keep a simulated vehicle in its lane. For an extra challenge, use computer vision techniques to identify the lane lines and estimate the cross-track error.
I hope this gives you a good sense of what students can expect from Term 2! Things may change along the way of course, as we absorb feedback, incorporate new content, and take advantage of new opportunities that arise, but we’re really excited about the curriculum we’ve developed with our partners, and we can’t wait to see what our students build!
In case you’d like a refresher on what was covered in Term 1, you can read my Term 1 curriculum post here.
In closing, if you haven’t yet applied to join the Udacity Self-Driving Car Engineer Nanodegree Program, please do! We are taking applications for the 2017 terms and would love to have you in the class!
Ford just committed to investing $1 billion in a nascent startup called Argo AI.
Despite my fondness for, and gratitude to, Ford Motor Company, I confess this is a little bit of a head-scratcher. The whole thing is just so unusual.
Why $1 BB?
Why over 5 years?
Why invest in the company instead of buying it outright?
Just to justify it after the fact, I might say something like this:
Ford has been betting big on self-driving cars for a while. But there are factors about the larger Ford Motor Company organization that make it difficult to move as fast as Ford CEO Mark Fields might want.
Ford HR has more structure and process than in a startup. Every new hire has to go through a drug screen. There are pay bands that might not line up with the salaries demanded by top AV engineers.
Ford IT is very concerned about security, which has implications for sharing code and using cloud computing services.
Ford Legal has a risk / reward view of the world that maybe doesn’t match up with the risk that say, Elon Musk, is willing to take.
There are other examples.
A year ago, to surmount these issues, Ford created Ford Smart Mobility, LLC. But unlike Argo AI, Ford Smart Mobility LLC is still a wholly-owned subsidiary of Ford. Maybe CEO Mark Fields wants to try something more radical.
One option is to fund a startup. But keep the investment at arms-length, so if anything goes terribly wrong, it won’t blow back on Ford Motor Company.
So instead of buying this new startup $1 BB, like GM did with Cruise, Ford is buying a big stake in the startup for much less (how much they own and at what price is not public). If all goes well, at some later date they can buy the rest of the startup and incorporate it into Ford Motor Company.
That’s pure speculation, but it’s the best I’ve got.
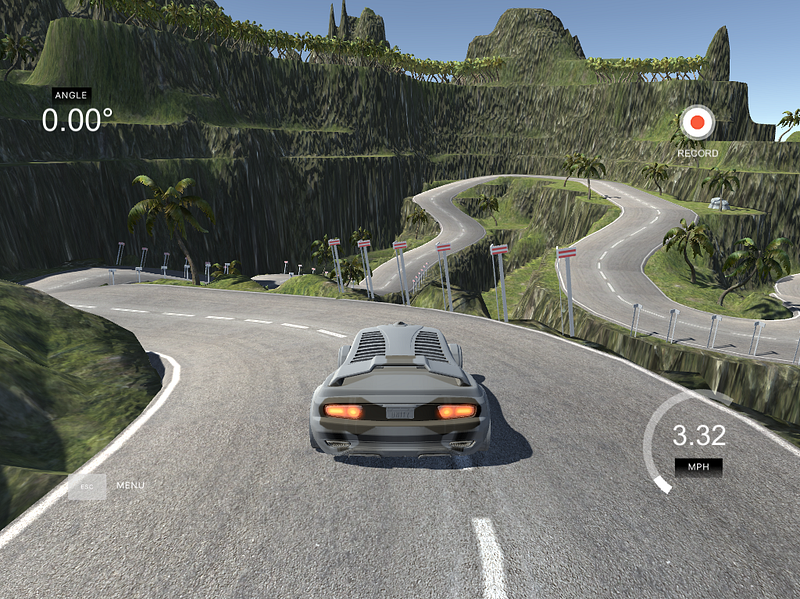
The idea was that students would drive a car around a test track in a simulator, record simulated camera data, and then build a deep neural network to drive the car in autonomously.
This is a cutting edge project that many autonomous vehicle startups are working on now in real life, and I figured it would be relatively simple to put it together as a project.
Man, was I wrong. We tried out many commercial simulators, none of which quite met our needs for various reasons. One was too realistic — students would have had to model the physical forces acting on the tires, another was way to unrealistic, others didn’t work on the various operating systems our students use.
So we wound up rolling our own simulator from scratch, using the Unity gaming engine. That brought its own set of pains, but it resulted in a really fun and educational project for students.
Yesterday we pushed the simulator code to GitHub and open-sourced it, so the world can help us improve the simulator and maybe people can even repurpose it for their own needs.
In full disclosure, I conceived of this project but I have not written a single line of code in the repo. Eric built the bulk of the simulator, with later assists from Yousuf, Dom, and Aaron. Kudos to them!
This is a concise, practical post detailing how Alex built his end-to-end network for driving a simulated vehicle. His discussion of balancing the dataset is particularly interesting.
Just as one would expect, resulting dataset was extremely unbalanced and had a lot of examples with steering angles close to 0 (e.g. when the wheel is “at rest” and not steering while driving in a straight line). So I applied a designated random sampling which ensured that the data is as balanced across steering angles as possible. This process included splitting steering angles into n bins and using at most 200 frames for each bin
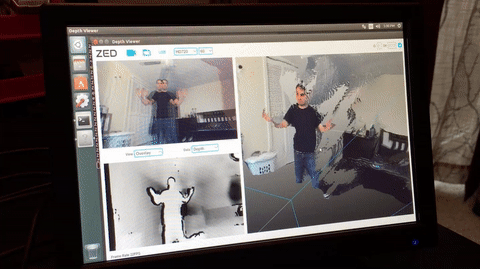
This is the latest in Dylan’s series on hacking his Subaru and turning it into a self-driving car. (This is not part of the Udacity program and we do not recommend this!) In this post, he unpacks his Jetson TX1 and gets the cameras do to some neat tricks.
The lighting conditions seem to make a difference with regard to depth accuracy. I’m excited to see how it performs outdoors. I plan to mount it just in front of my rear view mirror, where it will be mostly hidden from the driver’s field of view. I’m not sure about USB cable routing yet. It’s long enough to reach directly down to the dashboard, but I’d rather conceal it behind some interior panels.
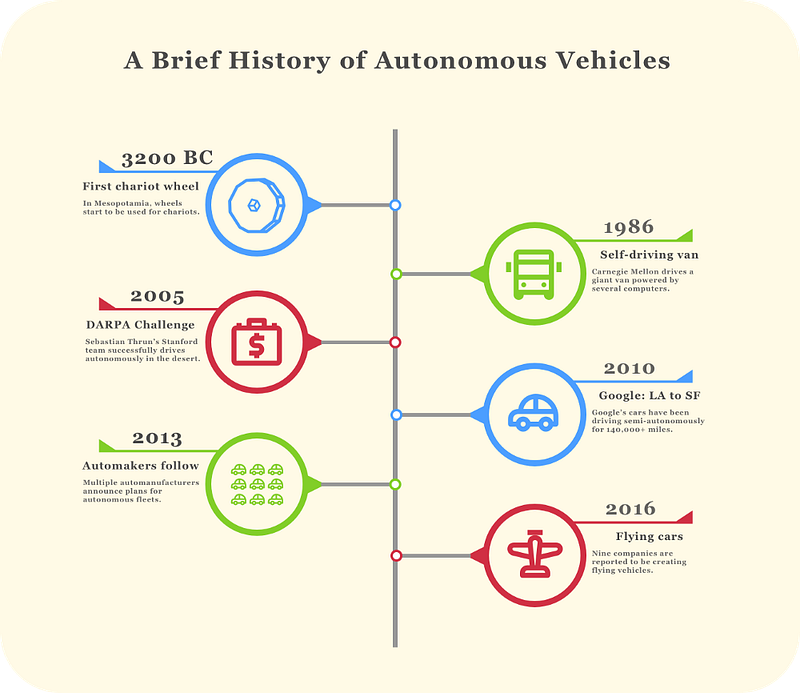
This is a great historical summary of autonomy, starting with the wheel (really, starting with ALVINN) and going through current efforts at autonomous personal aircraft.
If you had come to this article 10 years ago, hardly anyone would have heard of autonomous cars, or thought them possible for that matter. Now, there are ~100 companies working on autonomous vehicles, dozens of which have already been operating semi-autonomous vehicles.
Somehow this story slipped past me last October, but apparently Uber circulated a whitepaper outlining their plane to bring personal VTOL (vertical take-off and landing) aircraft to the masses.
The whitepaper itself is 97 pages long, but a more concise summary is on their Medium channel.
Uber outlines eleven major challenges for bringing VTOL to market at scale:
According to the press release by Uber CEO Travis Kalanick:
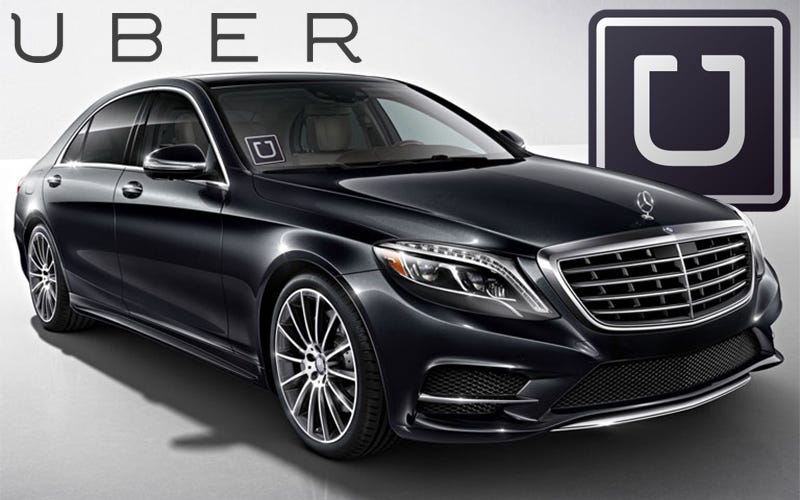
In the coming years, Daimler has planned to introduce and operate their own self-driving cars on Uber’s ridesharing network.
This is a new and interesting business model that is a little different than what I’ve seen before.
There has been speculation that some automotive manufacturers like Tesla might launch their own mobility services and compete directly with Uber. And there has been speculation that tech companies like Google might manufacture their own vehicles.
In this case, Mercedes-Benz is still manufacturing the vehicles, and they are retaining ownership, but they are deploying them on Uber’s network.
This might be a way for Mercedes-Benz to learn about ride-sharing from Uber, and for Uber to learn about automotive manufacturing from Mercedes-Benz.
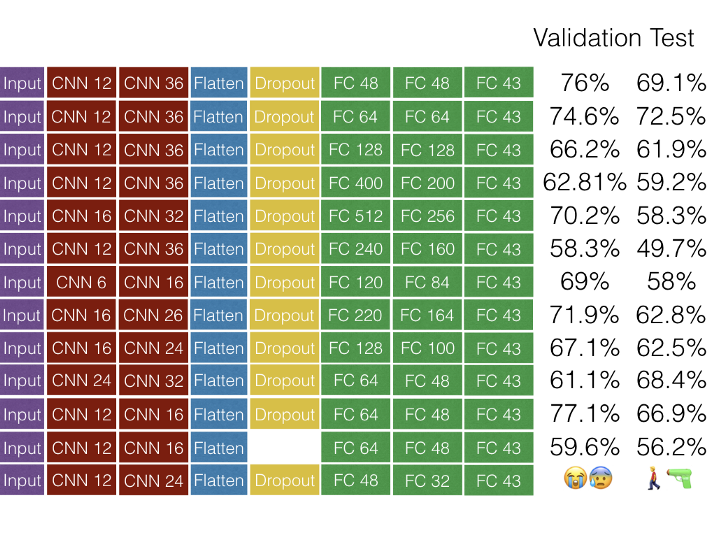
Andrew has lots of images in this blog post, including a spreadsheet of all the different functions he used in building his Traffic Sign Classifier with TensorFlow!
I got to explore TensorFlow and various libraries (see table below), different convolutional neural network models, pre-processing images, manipulating n-dimensional arrays and learning how to display results.
In this post, Param goes step-by-step through his iterative process of finding the right combination of pre-processing, augmentation, and network architecture for classifying traffic signs. 54 neural network architectures in all!
I went crazy by this point, nothing I would do would push me into the 90% range. I wanted to cry. A basic linearly connected model was giving me 85% and here I am using the latest hotness of convolution layers and not able to match.
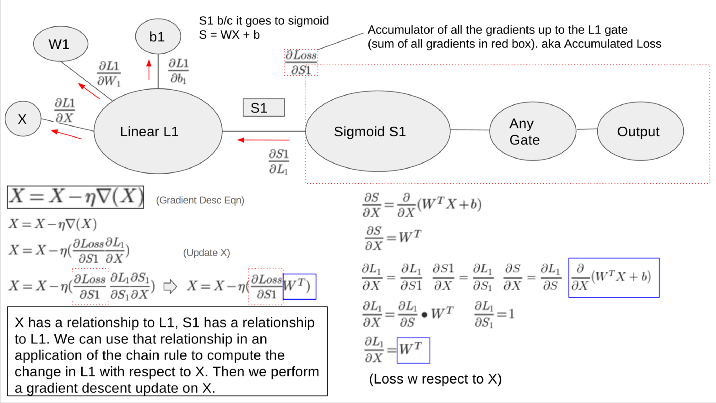
Backpropagation is the most difficult and mind-bending concept to understand about deep neural networks. After backpropagation, everything else is a piece of cake. In this concise post, Jonathan takes a crack and summarizing backpropagation in a few paragraphs.
When we are training a neural network we need to figure out how to alter a parameter to minimize the cost/loss. The first step is to find out what effect that parameter has on the loss. Then find the total loss up to that parameters point and perform the gradient descent update equation to that parameter.
Arnaldo presents a number of lessons he learned while designing an end-to-end network for driving in the Behavioral Cloning Project. In particular, he came to appreciate the power of GPUSs.
Using GPU is magic. Is like to give a Coke to someone in the desert. Or to buy a new car — the feeling of ‘how I was using that crap old one’. Or to find a shortcut in the route to the office: you’ll never use the long route again. Or to find a secret code in a game that give superpowers…
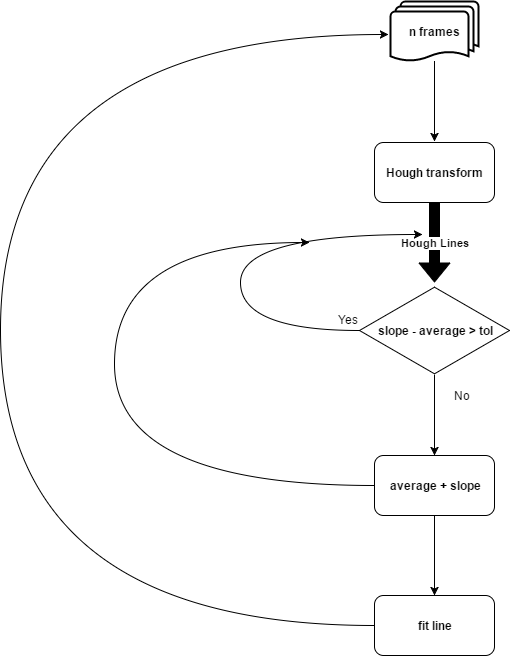
Esmat presents a well-organized outline of his Finding Lane Lines Porject and the computer vision pipeline that he used. In particular, he has a nice explanation of the Hough transform, which is a tricky concept!
The probabilistic Hough line transform more efficient implementation of Hough transform. It gives as output the extremes of the detected lines (x0, y0, x1, y1). It is difficult to detect straight lines which are part of a curve because they are very very small. For detecting such lines it is important to properly set all the parameters of Hough transform. Two of most important parameters are: Hough votes and maximum distance between points which are to be joined to make a line. Both parameters are set at their minimum value.
Students in Udacity’s Self-Driving Car Engineer Nanodegree Program go above and beyond to build terrific implementations of vehicle detectors, lane line detectors, neural networks for end-to-end learning, and career advice.
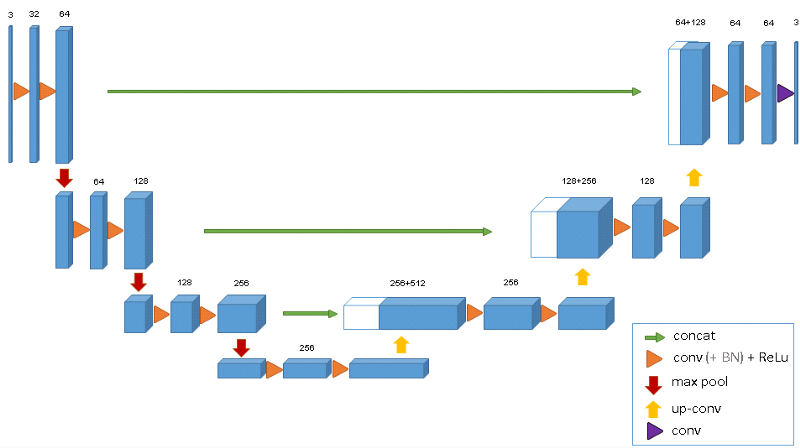
In the Vehicle Detection Project, students use standard computer vision methods to detect and localize vehicles in images taken from highway driving. Vivek went well beyond standard computer vision methods, and used U-Net, an encoder-decoder architecture that has proven effective for medical imaging. The results are astounding.
Another advantage of using a U-net is that it does not have any fully connected layers, therefore has no restriction on the size of the input image. This feature allows us to extract features from images of different sizes, which is an attractive attribute for applying deep learning to high fidelity biomedical imaging data. The ability of U-net to work with very little data and no specific requirement on input image size make it a strong candidate for image segmentation tasks.
Param provides a great walkthrough of his first project — Finding Lane Lines. He also includes a video that shows all of the intermediate steps necessary to find lane lines on the road. Then he applies his computer vision pipeline to a new set of videos!
This is the most important step, we use the Hough Transform to convert the pixel dots that were detected as edges into meaningful lines. It takes a bunch of parameters, including how straight should a line be to be considered a line and what should be the minimum length of the lines. It will also connect consecutive lines for us, is we specify the maximum gap that is allowed. This is a key parameter for us to be able to join a dashed lane into a single detected lane line.
Leading up to the Finding Lane Lines project, we teach students about some important computer vision functions for extracting lines from images. These are tools like Hough transforms and Canny edge detection. However, we leave it to the students to actually identify which lines correspond to the lane lines. Most students find some points and extrapolate y=mx+b. Peteris went beyond this, though, and taught himself how to use the numpy.polyfit() function in order to identify the line equation automatically!
If return to the original question, how do we extrapolate the lines?
Since we got a straight line, we can simply plug in points that are outside of our data set.
While training his end-to-end driving network for the Behavioral Cloning project, Vivek made us of extensive image augmentation. He flipped his images, resized them, added shadows, changed the brightness, and applied vertical and horizontal shifts. All of this allowed his model to generalize to an entirely new track that it had never seen before.
This was perhaps the weirdest project I did. This project challenged all the previous knowledge I had about deep learning. In general large epoch size and training with more data results in better performance, but in this case any time I got beyond 10 epochs, the car simply drove off the track. Although all the image augmentation and tweaks seem reasonable n0w, I did not think of them apriori.
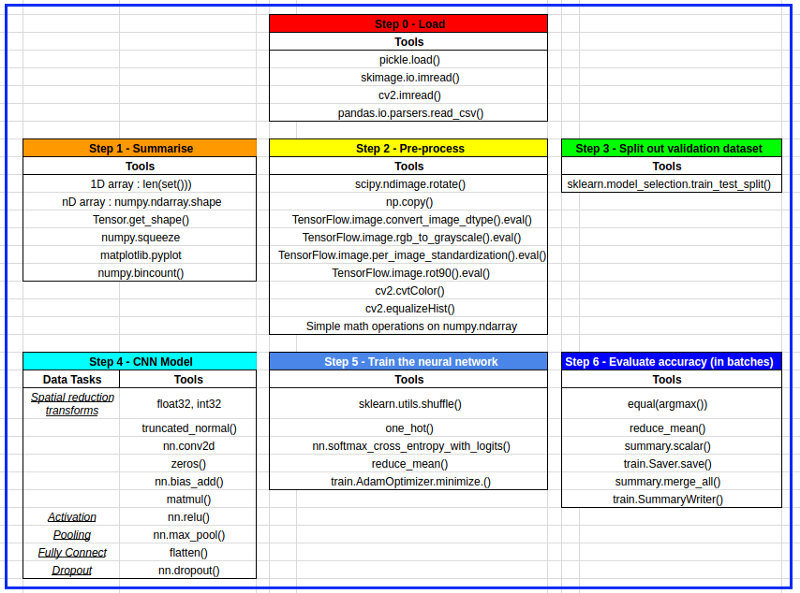
Miguel’s practical post covers some of the different angles from which a self-driving car engineer might need to know C++, ROS, and other autonomous vehicle development tools. It’s a great read if you’re looking for a job in the industry!
Self-Driving Car Engineers use C/C++ to squeeze as much speed out of the machine as possible. Remember, all processing in autonomous vehicles is done in real-time and even sometimes in parallel architectures, so you will have to learn to code for the CPU but also the GPU. It is vital for you to deliver software that can process large amount of images (think about the common fps — 15, 30 or even 60) every second.
Here are five terrific posts by Udacity Self-Driving Car students covering advanced convolutional neural network architectures, how to set up AWS instances, and aspirations for CarND.
Alex took the basic convolutional neural network tools we teach in the program, and built on them to create a killer traffic sign classifier. He used extensive data augmentation, and an advanced network architecture with multi-scale feature extraction.
Basically with multi-scale features it’s up to classifier which level of abstraction to use, as it has access to outputs from all convolutional layers (e.g. features on all abstraction levels).
Sridhar has a fun summary of his experience in the program so far, including great detail about some sophisticated data augmentation and network architectures that he used. I also laughed when mentioned why he enrolled.
So then why did I choose this course over other available courses? “The main reason was that I have experience in ADAS so this course was a perfect fit for my career passion”. Also, it was like a monopoly.
Subhash has clear and concise descriptions of the computer vision tools he uses for his Finding Lane Lines Project. A bonus section includes him trying to find lanes on roads in India!
The part remaining is to discover lines in the edge pixels. Before attempting this, we need to rethink a point in terms of all the lines that can possibly run through it. Two points will then have their own sets of possible lines with one common line that runs through both of them. If we could plot the line-possibilities of these two points, both points will “vote” for that line that passes through both of them.
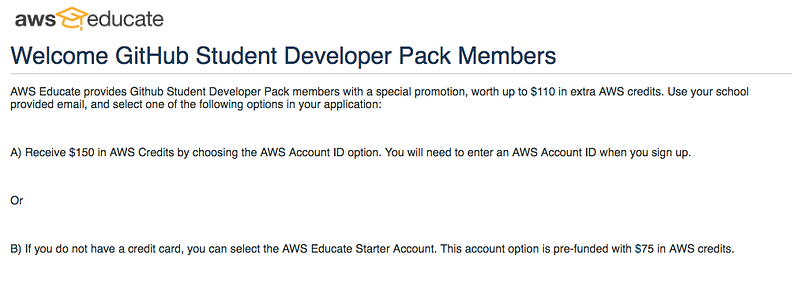
Himanshu has a great tutorial on how to set up an AWS EC2 instance with a GPU to accelerate deep learning. It includes tips on how to get free AWS credits! (I should note that since Himanshu wrote this we have included our own tutorial within the program, but this is still a great post and more free credits are always welcome!)
I will be helping you out in the following setup * AWS Account setup and $150 Student Credits. * Tensorflow-GPU setup with all other libraries.
Mojtaba joins us from Iran, which is really inspiring given the backdrop of world events right now. We are excited to have him and he is excited to be in the program!
Maybe Sebastian Thrun has no idea who am I and how much respect I have for him. I made a autonomous vehicle because I saw his course (Artificial Intelligence for Robotics), I learned a lot from him and the power of ROS (Robot Operating System). I really love this field of study and I follow everything related to autonomous vehicles since 2004 (When DARPA started everything). And now I am in the first Cohort in the Self Driving Cars Nano Degree (SDCND) thanks to David Silver, Todd Gore, Oliver Cameron, Stuart Frye and other Udacians.