DRIVE Labs is a really nice series of lessons about NVIDIA’s deep learning approach to autonomous vehicle development. They have about twenty short videos, each accompanied by a longer blog post and dedicated to specific aspect of self-driving.
The videos are hosted by Neda Cvijetic, NVIDIA’s Sr. Manager of Autonomous Vehicles.
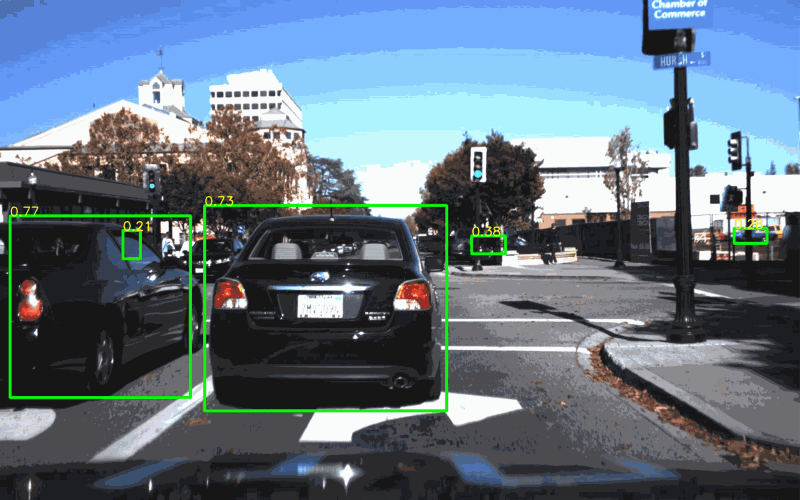
I particularly like this video on path prediction, which is an area of autonomous technology that really fascinates me.
NVIDIA is most famous for producing graphical processing units, which are useful for both video games and deep learning. As such, NVIDIA really specializes in applying neural networks to autonomous vehicle challenges.
One of the best developments around self-driving cars in the last few years is how open companies have become in sharing their technology, or at least the result of what their software can do. It’s a lot of fun to watch.
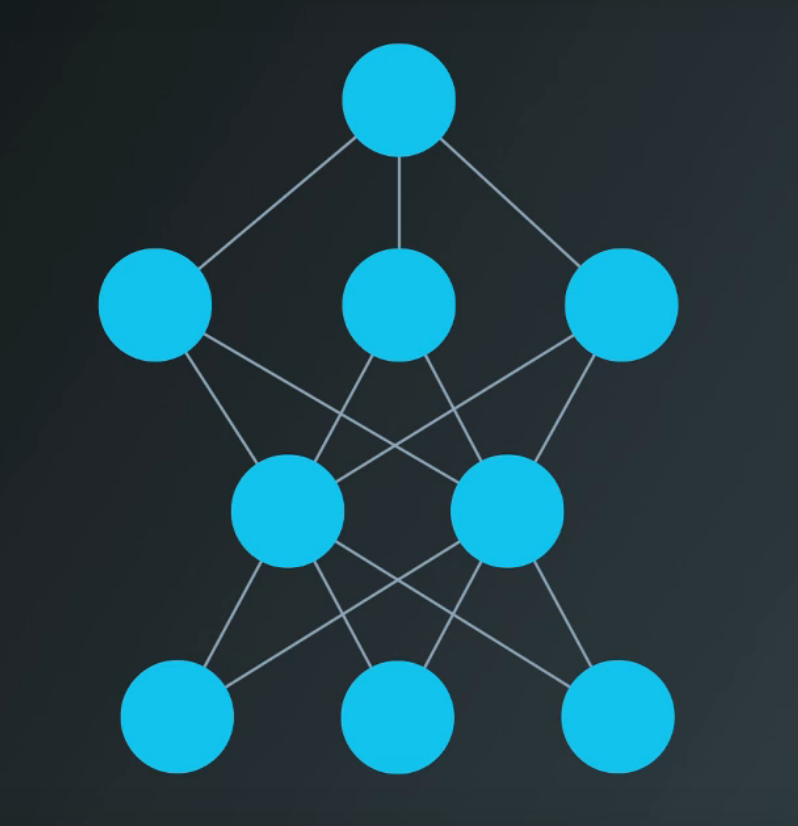
The blog post describes how Waymo uses deep learning to tackle the challenging problem of predicting the future. Specifically, Waymo vehicles need to predict what everyone else on the road is going to do.
A model-based approach relies on our knowledge (“model”) of how actors behave. A car turning left through an intersection is likely to continue turning left, rather than come to a complete stop, or reverse, or switch to a right-turn.
A data-driven approach uses machine learning to process data from real world-observations and apply the resulting model to new scenarios.
VectorNet is a data-driven approach takes relies heavily on the semantic information from its high-definition maps. Waymo converts semantic information — turn lanes, stop lines, intersections — into vectors, and then feeds those vectors into a hierarchical graph neural network.
I’m a bit out of touch with the state-of-the-art in deep learning, so I followed a link from Waymo down a rabbit hole. First I read “An Illustrated Guide to Graph Neural Networks,” by a Singaporean undergrad named Rishabh Anand.
It was a longer rabbit hole than I anticipated, but this talk was just right for me. It has a quick fifteen minute review of CNNs, followed by a quick fifteen minute review of graph theory. About thirty-minutes in she does a really nice job covering the fundamentals of graph neural networks and how they allow us to feed structured data from a graph into a neural network.
My Udacity colleague, Cezanne Camacho, is preparing a presentation on capsule networks and gave a draft version in the office today. Cezanne is a terrific engineer and teacher, and she’s already written a great blog post on capsule networks, and she graciously allowed me to share some of that here.
Capsule networks come from a 2017 paper by Sara Sabour, Nicholas Frosst, and Geoffrey Hinton at Google: “Dynamic Routing Between Capsules”. Hinton, in particular, is one of the world’s foremost authorities on neural networks.
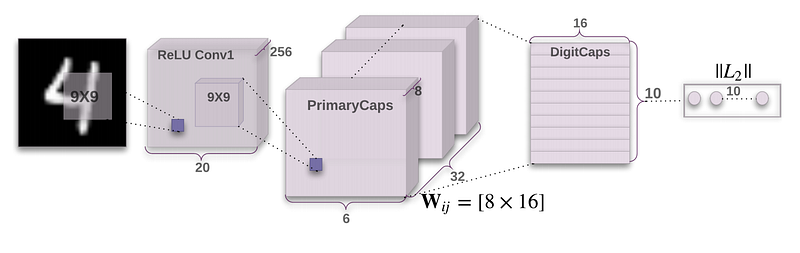
Capsule Networks provide a way to detect parts of objects in an image and represent spatial relationships between those parts. This means that capsule networks are able to recognize the same object in a variety of different poses even if they have not seen that pose in training data.
Love the Pacman GIF. Did I mention Cezanne is also an artist?
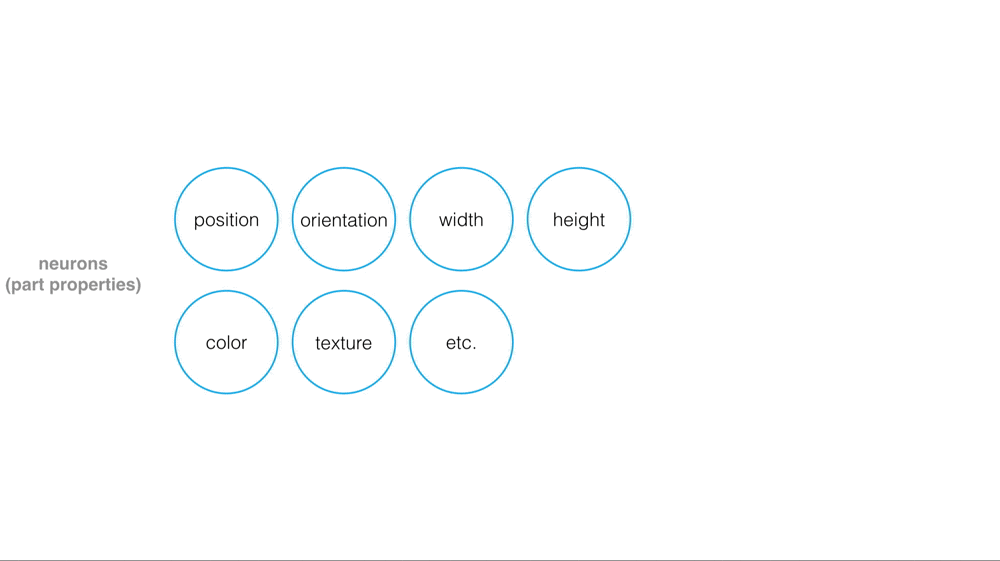
Cezanne explains that a “capsule” encompasses features that make up a piece of an image. Think of an image of a face, for example, and imagine capsules that capture each eye, and the nose, and the mouth.
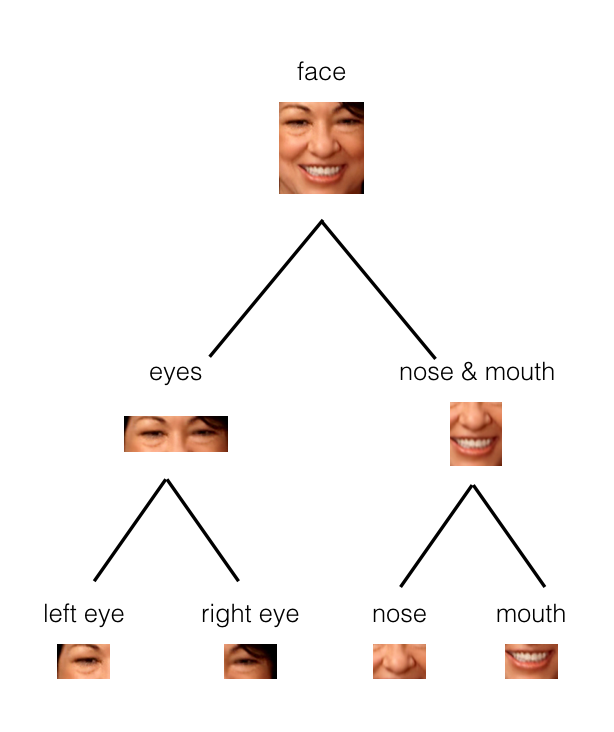
These capsules organize into a tree structure. Larger structures, like a face, would be parent nodes in the tree, and smaller structures would be child nodes.
“In the example below, you can see how the parts of a face (eyes, nose, mouth, etc.) might be recognized in leaf nodes and then combined to form a more complete face part in parent nodes.”
“Dynamic routing” plays a role in capsule networks:
“Dynamic routing is a process for finding the best connections between the output of one capsule and the inputs of the next layer of capsules. It allows capsules to communicate with each other and determine how data moves through them, according to real-time changes in the network inputs and outputs!”
Dynamic routing is ultimately implemented via an iterative routing process that Cezanne does a really nice job describing, along with the accompanying math, in her blog post.
Capsule networks seem to do well with image classification on a few datasets, but they haven’t been widely deployed yet because they are slow to train.
In these projects, students showcase initiative, creativity, and work ethic, as they build projects focused on topics like perception, deep learning, and computer vision.
Their intense interest in these topics translates directly to the high quality of their work. Today, I’d like to share three especially impressive student projects with you that cover these areas!
I love this project! Mohammad did it on his own, and he went way beyond the requirements of the Nanodegree program to do so. That’s going to serve him well in the long run, because employers love it when talented students get so deep into particular subjects, that they start building their own projects to further flesh out their ideas and test their skills.
“In this project I have used a pre-trained ResNet50 network, removed its classifier layers so it becomes a feature extractor, and then added the YOLO classifier layer instead (randomly initialized). I then trained the network on Udacity’s CrowdAI dataset to detect cars in video frames.”
Enrique used VGG-16 to create a semantic segmentation network for the Advanced Deep Learning project in the Nanodegree program. He trained that network using the KITTI dataset, and then applied the network to scenes he recorded driving in Mexico. Check out his YouTube videos!
“The original FCN-8s was trained in stages. The authors later uploaded a version that was trained all at once to their GitHub repo. The version in the GitHub repo has one important difference: The outputs of pooling layers 3 and 4 are scaled before they are fed into the 1×1 convolutions. As a result, some students have found that the model learns much better with the scaling layers included. The model may not converge substantially faster, but may reach a higher IoU and accuracy.”
Moataz built a vehicle detection pipeline combining histogram of oriented gradients, support vector machines, and sliding window search. I particularly like the heatmap he employs to reduce false positives in vehicle detection. This is a great example of going beyond the steps outlined in the Nanodegree program, to build a truly standout project.
“Now given the simplicity of the SVM model, we expect some detections to be false positives. In order to filter out these incorrect detections, one approach is to threshold our positive windows such that we only pick areas where more than one window overlap. In essence we are generating a heatmap of the positive windows.”
Udacity practices project-based learning, which means all of our students in all of our Nanodegree programs build projects like these. This approach enables you to learn practical skills, and to build a dynamic portfolio populated with completed projects that clearly showcase your new skills and experience.
In this project, students build and train a deep neural network to classify images from the German Traffic Sign Recognition Benchmark dataset. There are about 40 different types of German traffic signs in the dataset, each 32×32 pixels big. That’s not very big!
Nonetheless, each image is big enough for students to train a convolutional neural network to recognize what type of sign it is, with 95%+ accuracy. That’s close to, or even better than, the accuracy that humans like you and I reach when we classify images by sight.
The lesson starts out with a tour of LeNet, one of the canonical network architectures for image classification. We step through how to implement LeNet in TensorFlow, highlighting data preparation, training and testing, and configuring convolutional, pooling, and fully-connected layers.
We also show students how to spin-up a GPU-enabled EC2 instance from our partners at Amazon Web Services. Thank you to AWS Educate for providing free AWS credits to Udacity students!
At the end of the lesson, students get to apply, tweak, or completely revamp LeNet to train their own classifier. If you want to compare yourself to Yann LeCun, here’s how he did with the same dataset:
Ready to start learning how to build self-driving cars yourself? Great! If you have some experience already, you can apply to our Self-Driving Car Engineer Nanodegree program here, and if you’re just getting started, then we encourage you to enroll in our Intro to Self-Driving Cars Nanodegree program here!
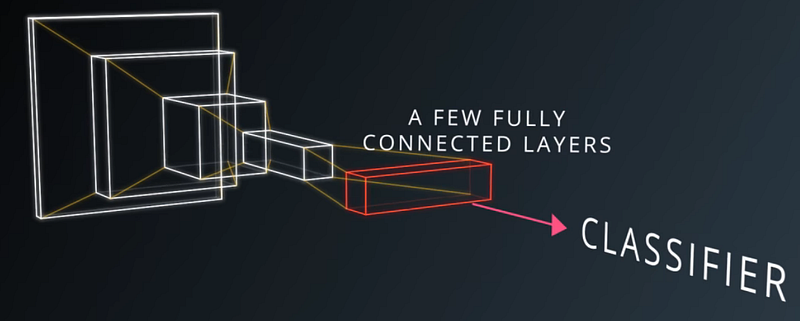
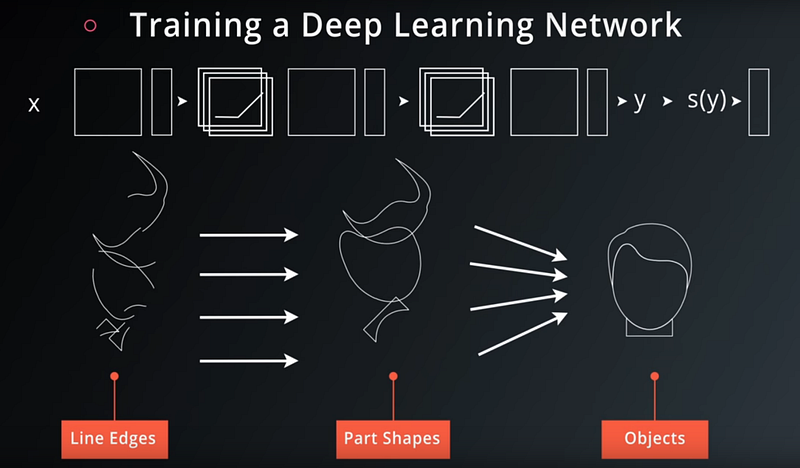
The 8th lesson of the Udacity Self-Driving Car Engineer Nanodegree program is “Convolutional Neural Networks.” This is where students learn to apply deep learning to camera images!
Convolutional neural networks (CNNs) are a special category of deep neural networks that are specifically designed to work with images. CNNs have multiple layers, with each layer connected to the next by “convolutions.”
In practice, what this means is that we slide a patch-like “filter” over the input layer, and the filter applies weights to each artificial neuron in the input layer. The filter connects to a single artificial neuron in the output layer, thereby connecting each neuron in the output layer to a small set of neurons from the input layer.
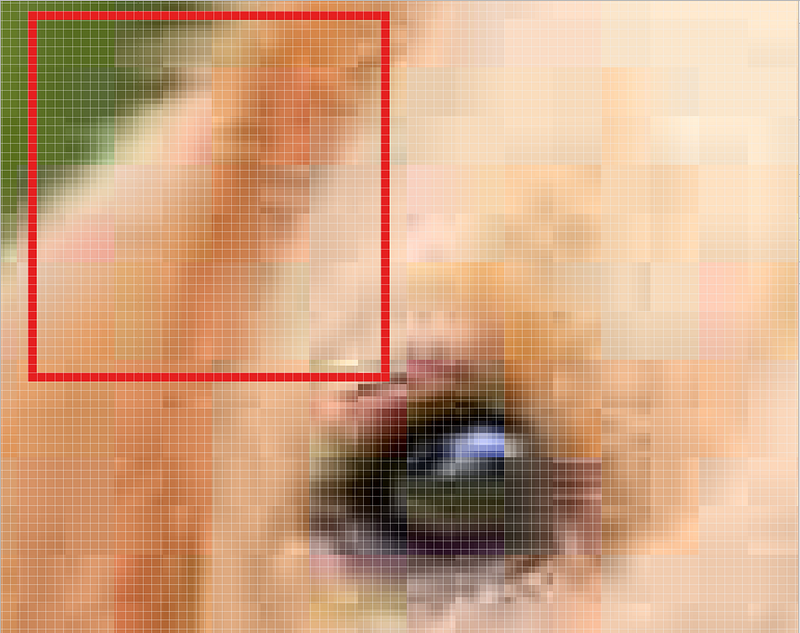
To make this more concrete, consider this photograph of a dog:
When we run this photograph through a CNN, we’ll slide a filter over the image:
This filter will, broadly speaking, identify basic “features.” It might identify one frame as a curve, and another as a hole:
CurveHole
The next layer in the CNN would pass a different filter over a stack of these basic features, and identify more sophisticated features, like a nose:
Nose
The final layer of the CNN is responsible for classifying these increasingly sophisticated features as a dog.
This is of course simplified for the sake of explanation, but hopefully it helps to make the process clear.
One of the more vexing aspects of deep learning is that the actual “features” that a network identifies are not necessarily anything humans would think of as a “curve” or a “nose.” The network learns whatever it needs to learn in order to identify the dog most effectively, but that may not be anything humans can really describe well. Nonetheless, this description gets at the broad scope of how a CNN works.
Once students learn about CNNs generally, it’s time to practice building and training them with TensorFlow. As Udacity founder Sebastian Thrun says, “You don’t lose weight by watching other people exercise.” You have to write the code yourself!
The back half of the lesson covers some deep learning topics applicable to CNNs, like dropout and regularization.
The lesson ends with a lab in which students build and train LeNet, the famous network by Yann LeCun, to identify characters. This is a classic exercise for learning convolutional neural networks, and great way to learn the fundamentals.
Ready to start learning how to build self-driving cars yourself? Great! If you have some experience already, you can apply to our Self-Driving Car Engineer Nanodegree program here, and if you’re just getting started, then we encourage you to enroll in our Intro to Self-Driving Cars Nanodegree program here!
~
Thanks to my former colleague, Dhruv Parthasarathy, who built out this intuitive explanation in even greater detail as part of this lesson!
Lesson 7 of the Udacity Self-Driving Car Engineer Nanodegree Program is “Deep Neural Networks”
I am continuing on my quest to write a post detailing every one of the 67 projects that currently comprise our Self-Driving Car Engineer Nanodegree program curriculum, and today, we look at the “Deep Neural Networks” lesson!
Students actually start learning about deep neural networks prior to this lesson, but this is the lesson where students begin to implement deep neural networks in TensorFlow, Google’s deep learning framework.
In the previous lesson, “Introduction to TensorFlow,” students learned to use TensorFlow to build linear models, like linear or logistic regression. In the “Deep Neural Networks” lesson, students learn new techniques in TensorFlow, to build up these models into neural networks.
Some of the most important foundational blocks of neural networks are demonstrated in TensorFlow.
Activation functions help neural networks represent non-linear models
Backpropagation trains neural networks from real data quickly and efficiently
Dropout removes neurons randomly during training to prevent overfitting the training data, which makes the model more accurate on new data
Students also learn some practical skills, like how to save and restore models in TensorFlow.
Future lessons take these basic skills and help students apply them to important problems for autonomous vehicles, like how to recognize traffic signs.
TensorFlow is Google’s library for deep learning, and one of the most popular tools for building and training deep neural networks. In the previous lesson, MiniFlow, students build their own miniature versions of a deep learning library. But for real deep learning work, an industry-standard library like TensorFlow is essential.
Students learn the differences between regression and classification problems. Then they to build a logistic classifier in TensorFlow. Finally, students use fundamental techniques like activation functions, one-hot encoding, and cross-entropy loss to train feedforward networks.
Most of these topics are already familiar to students from the previous “Introduction to Neural Networks” and “MiniFlow” lessons, but implementing them in TensorFlow is a whole new animal. This lesson provides lots of quizzes and solutions demonstrating how to do that.
Towards the end of the lesson, students walk through a quick tutorial on using GPU-enabled AWS EC2 instances to train deep neural networks. Thank you to our friends at AWS Educate for providing free credits to Udacity students to use for training neural networks!
Deep learning has been around for a long time, but it has only really taken off in the last five years because of the ability to use GPUs to dramatically accelerate the training of neural networks. Students who have their own high-performance GPUs are able to experience this acceleration locally. But many students do not own their own GPUs, and AWS EC2 instances are a cloud tool for achieving the same results from anywhere.
The lesson closes with a lab in which students use TensorFlow to perform the classic deep learning exercise of classifying characters: ‘A’, ‘B’, ‘C’ and so on.
Exploring how to build a Self-Driving Car, step-by-step with Udacity!
Editor’s note: David Silver (Program Lead for Udacity’s Self-Driving Car Engineer Nanodegree program), continues his mission to write a new post for each of the 67 lessons currently in the program. We check in with him today as he introduces us to Lesson 5!
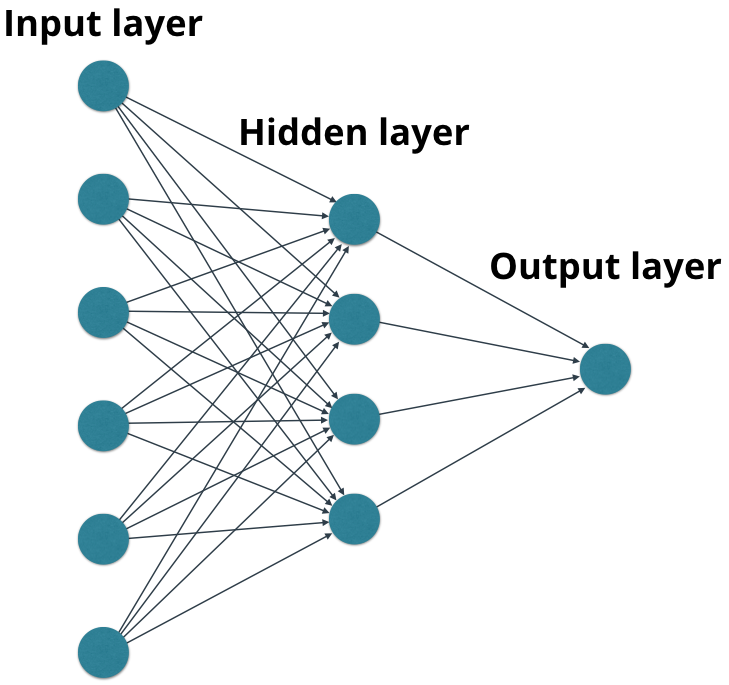
The lesson starts with a fairly basic, feedforward neural network, with just a few layers. Students learn to build the connections between the artificial neurons and implement forward propagation to move calculations through the network.
A feedforward network.
The real mind-bend comes in the “Linear Transform” concept, where we go from working with individual neurons to working with layers of neurons. Working with layers allows us to dramatically accelerate the calculations of the networks, because we can use matrix operations and their associated optimizations to represent the layers. Sometimes this is called vectorization, and it’s a key to why deep learning has become so successful.
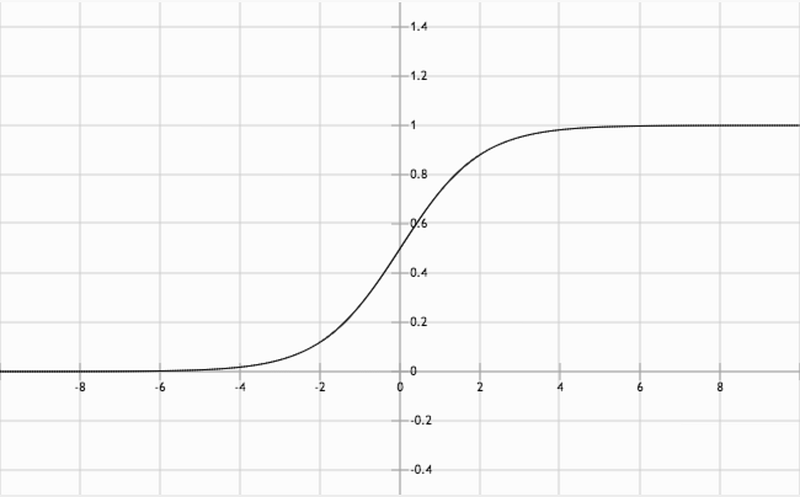
Once students implement layers in MiniFlow, they learn about a particular activation function: the sigmoid function. Activation functions define the extent to which each neuron is “on” or “off”. Sophisticated activation functions, like the sigmoid function, don’t have to be all the way “on” or “off”. They can hold a value somewhere along the activation function, between 0 and 1.
The sigmoid function.
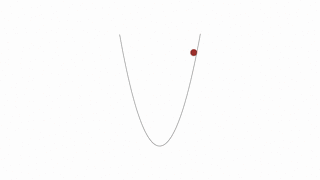
The next step is to train the network to better classify our data. For example, if we want the network to recognize handwriting, we need to adjust the weight associated with each neuron in order to achieve the correct classification. Students implement an optimization technique called gradient descent to determine how to adjust the weights of the network.
Gradient descent, or finding the lowest point on the curve.
Finally, students implement backpropagation to relay those weight adjustments backwards through the networks, from finish to start. If we do this thousands of times, hopefully we’ll wind up with a trained, accurate network.
And once students have finished this lesson, they have their own Python library they can use to build as many neural networks as they want!
Editor’s note: On November 1st of this year, David Silver (Program Lead for Udacity’s Self-Driving Car Engineer Nanodegree program) made a pledge to write a new post for each of the 67 lessons currently in the program. We check in with him today as he introduces us to Lesson 4!
This is a fast lesson that covers the basic mechanics of machine learning and how neural networks operate. We save a lot of the details for later lessons.
My colleague Luis Serrano starts with a quick overview of how regression and gradient descent work. These are foundational machine learning concepts that almost any machine learning tool builds from.
Luis is great at this stuff. I love Mt. Errorest.
Moving on from these lessons, Luis goes deeper into the distinction between linear and logistic regression and then explores how these concepts can reveal the principles behind a basic neural network.
See the slash between the red and green colors there? If you ever meet Luis in person, ask him to sing you the forward-slash-backward-slash alphabet song. It’s amazing.
From here we introduce perceptrons, which historically were the precursor to the “artificial neurons” that make up a neural network.
As we string together lots of these perceptrons, or “artificial neurons”, my colleague Mat Leonard shows that we can take advantage of a process called backpropagation, that helps train the network to perform a task.
And that’s basically what a neural network is: a machine learning tool built from layers of artificial neurons, which takes an input and produces an output, trained via backpropagation.
This lesson has 23 concepts (pages), so there’s a lot more to it than the 3 videos I posted here. If some of this looks confusing, don’t worry! There’s a lot more detail in the lesson, as well as lots of quizzes to help make sure you get it.