Chris Brewer, the Chief Engineer of Ford’s autonomous vehicle program, provides a great reminder that there is more to a self-driving car than just the virtual driver system. There’s also a car underneath it all 🙂
The New York Times ran a good story about the importance of maps to self-driving cars, and the relatively few companies that build them.
This is an often-overlooked chokepoint in the self-driving car ecosystem.
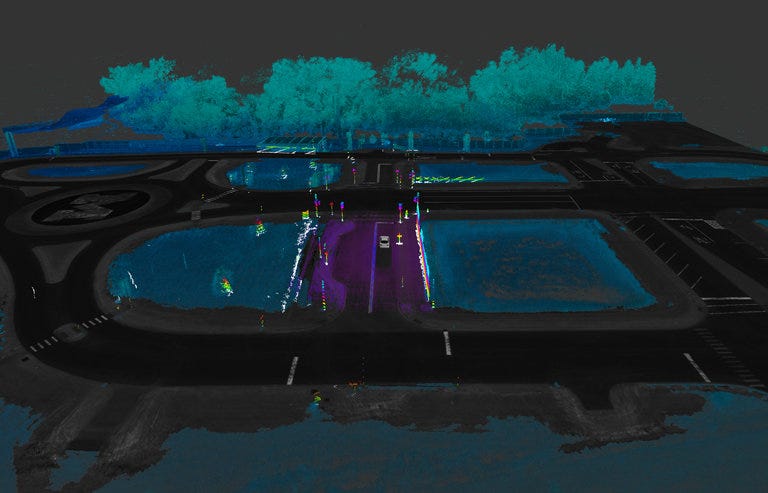
Digital maps ease the burden by helping give foresight to a car’s computers, and adding redundancy to the car’s understanding of the situation it faces, said Civil Maps’ chief executive, Sravan Puttagunta. Radar and cameras cannot always recognize a stop sign if pedestrians are standing in the way or the sign has been knocked down, he explained.
“But if the map knows there is a stop sign ahead, then the sensors just need to confirm it,” Mr. Puttagunta said. “Then the load on the sensors and processor is much lower.”
News broke about a week ago of a new startup called Embark, which is targeting self-driving trucks.
I first heard of this company about a year ago, when they were called Varden Labs. My father-in-law is a retired Sacramento State University administrator, and he was excited that Varden Labs was testing self-driving shuttles on-campus.
The Varden Labs website is still up, and it looks like they are hiring.
I’m pretty late to the Waymo v. Uber commentary stream, and I don’t have anything substantive to contribute.
Otto has been a great partner to the Udacity Self-Driving Car Engineer Nanodegree Program, and they are genuinely excited to teach people about how to get jobs working on self-driving cars. Our partnership has only gotten better since Otto became Uber ATG. I’ve met Anthony Levandowski briefly and he seems like a gentleman, and I know Sebastian thinks highly of him.
So that’s full disclosure.
My main reaction, though, is just how surprising the topic of the lawsuit is. Google sues Uber and the suit hinges on the design of lidar hardware?
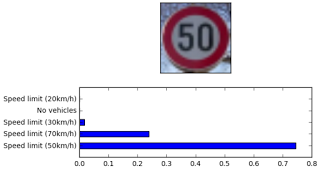
Sujay’s managed his data in a few clever ways for the traffic sign classifier project. First, he converted all of his images to grayscale. Then he skewed and augmented them. Finally, he balanced the data set. The result:
“The validation accuracy attained 98.2% on the validation set and the test accuracy was about 94.7%”
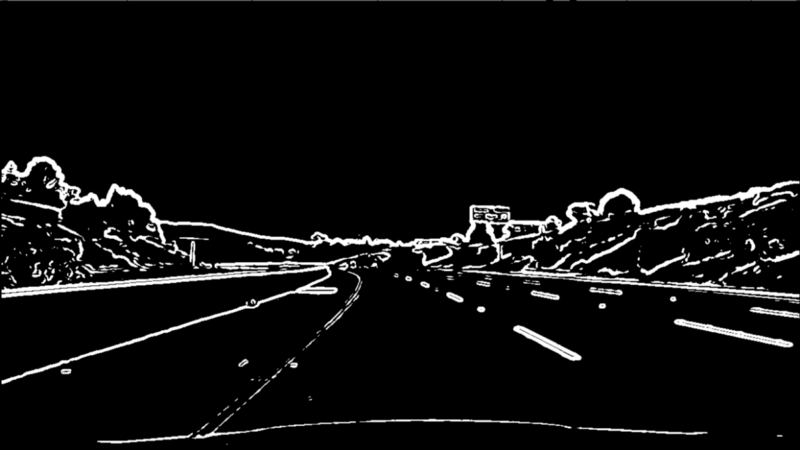
An’s post is a great step-through of how to use OpenCV to find lane lines on the road. It includes lots of code samples!
“Project summary: – Applying calibration on all chessboard images that are taken from the same camera recording the driving to obtain distort coefficients and matrix. – Applying perspective transform and warp image to obtain bird-eyes view on road. – Applying binary threshold by combining derivative x & y, magnitude, direction and S channel. – Reduce noise and locate left & right lanes by histogram data. – Draw line lanes over the image”
Rana’s video shows the amazing results that are achievable with Support Vector Classifiers. Look at how well the bounding boxes track the other vehicles on the highway!
Cherkeng’s approach to the Traffic Sign Classification Project was based on an academic paper that uses “dense blocks” of convolutional layers to fit the training data tightly. He also uses several clever data augmentation techniques to prevent overfitting. Here’s how that works out:
“The new network is smaller with test accuracy of 99.40% and MAC (multiply–accumulate operation counts) of 27.0 million.”
Arnaldo has a thorough walk-through of the Udacity Advanced Lane Finding Project. If you want to know how to use computer vision to find lane lines on the road, this is a perfect guide!
“1 Camera calibration 2 Color and gradient threshold 3 Birds eye view 4 Lane detection and fit 5 Curvature of lanes and vehicle position with respect to center 6 Warp back and display information 7 Sanity check 8 Video”
I love this how-to post that lists all the components for a mid-line deep learning rig. Not too cheap, not too expensive. Just right.
Here’s how it does:
“As you can see above, my new machine (labeled “DL Rig”) is the clear winner. It performed this task more than 24 times faster than my MacBook Pro, and almost twice as fast as the AWS p2.large instance. Needless to say, I’m very happy with what I was able to get for the price.”
Companies like Uber and Lyft and Seamless and Fiverr and Upwork facilitate armies of independent contractors who work “gigs” on their own time, for as much money as they want, but without the structure of traditional employment.
Caleb makes the point that, for all the press the gig economy gets, the end might be in sight. Many of these gigs might soon be replaced by computers and robots. He illustrates this point with his colleague, Eric, who works as a safety driver for the autonomous vehicle startup Auro Robotics. Auro’s whole mission is to eliminate Eric’s job!
“Don’t feel too bad for Eric though. He’s become skilled with hardware and robotics. His experience working in cooperation with a robot can enable him to build better systems that don’t need explicit instructions.”
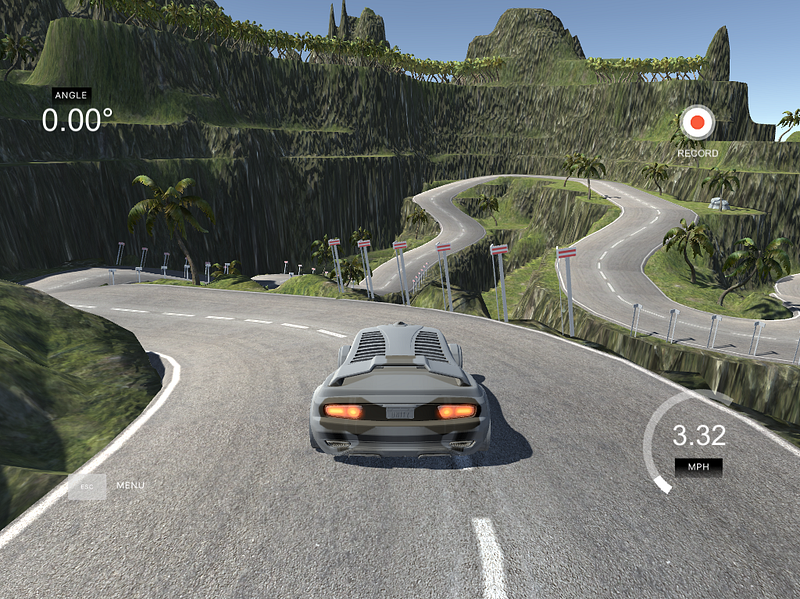
In this project, each student uses the Udacity Simulator to drive a car around a track and record training data. Students use the data to train a neural network to drive the car autonomously. This is the same problem that world-class autonomous vehicle engineering teams are working on with real cars!
There are so many ways to tackle this problem. Here are six approaches that different Udacity students took.
Andrew’s post highlights the differences between the Keras neural network framework and the TensorFlow framework. In particular, Andrew mentions how much he likes Keras:
“We were introduced to Keras and I almost cried tears of joy. This is the official high-level library for TensorFlow and takes much of the pain out of creating neural networks. I quickly added Keras (and Pandas) to my Deep Learning Pipeline.”
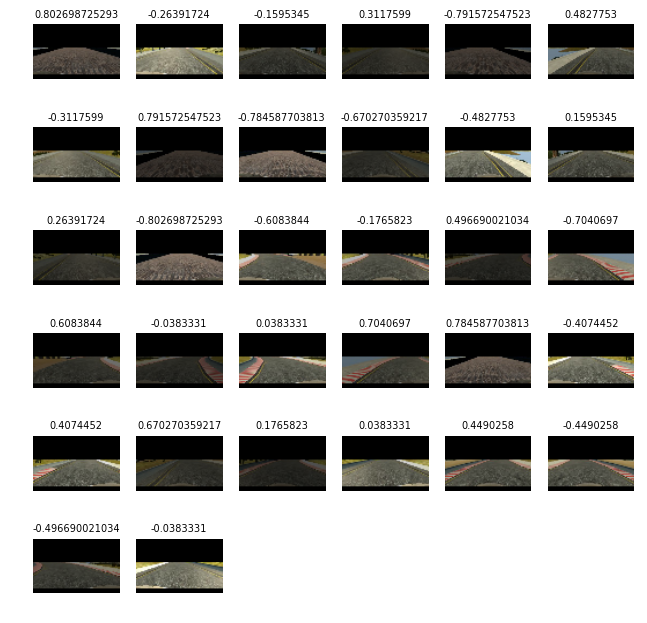
Jean-Marc used extensive data augmentation to improve his model’s performance. In particular, he used images from offset cameras to create “synthetic cross-track error”. He built a small model-predictive controller to correct for this and train the model:
“A synthetic cross-track error is generated by using the images of the left and of the right camera. In the sketch below, s is the steering angle and C and L are the position of the center and left camera respectively. When the image of the left camera is used, it implies that the center of the car is at the position L. In order to recover its position, the car would need to have a steering angle s’ larger than s:
Alena used transfer learning to build her end-to-end driving model on the shoulders of a famous neural network called VGG. Her approach worked great. Transfer learning is a really advanced technique and it’s exciting to see Alena succeed with it:
I have chosen VGG16 as a base model for feature extraction. It has good performance and at the same time quite simple. Moreover it has something in common with popular NVidia and comma.ai models. At the same time use of VGG16 means you have to work with color images and minimal image size is 48×48.
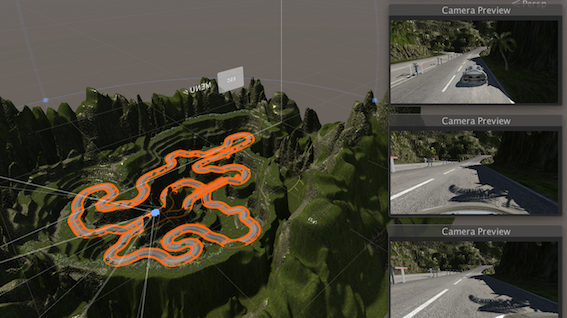
The Behavioral Cloning Project utilizes the open-source Udacity Self-Driving Car Simulator. In this post, Naoki introduces the simulator and dives into the source code. Follow Naoki’s instructions and build a new track for us!
“If you want to modify the scenes in the simulator, you’ll need to deep dive into the Unity projects and rebuild the project to generate a new executable file.”
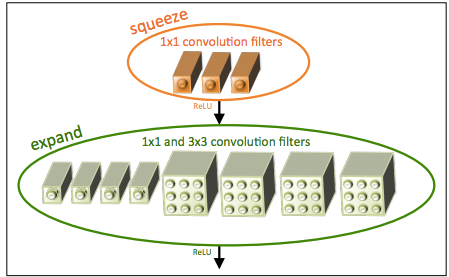
In this post, Mez explains the implementation of SqueezeNet for the Behavioral Cloning Project. This is smallest network I’ve seen yet for this project. Only 52 parameters!
“With a squeeze net you get three additional hyperparameters that are used to generate the fire module:
1: Number of 1×1 kernels to use in the squeeze layer within the fire module
2: Number of 1×1 kernels to use in the expand layer within the fire module
3: Number of 3×3 kernels to use in the expand layer within the fire module”
The testing will happen in partnership with Lyft and would vault GM ahead of any other auto manufacturer. Most auto manufacturers have committed to testing cars in 2020 or later.
I don’t know whether to believe this or not, but it’s exciting.
Both of these approaches can be for working with images, and it’s important to understand standard computer vision techniques, particularly around camera physics. This knowledge improves the performance of almost all image manipulation tools.
Here are some of the skills that Udacity students mastered while using standard computer vision techniques to handle highway perception tasks. Check out how similar these images and videos look to what you might see on cutting edge autonomous driving systems!
This is a terrific summary of the mathematics underpinning lane-finding. Milutin covers vanishing points, camera calibration and undistortion, and temporal filtering. If you’re interested in diving into the details of how a camera can find lane lines, this is a great start.
Here’s an example:
“Before we move further on, lets just reflect on what the camera matrix is. The camera matrix encompasses the pinhole camera model in it. It gives the relationship between the coordinates of the points relative to the camera in 3D space and position of that point on the image in pixels. If X, Y and Z are coordinates of the point in 3D space, its position on image (u and v) in pixels is calculated using:
where M is camera matrix and s is scalar different from zero.”
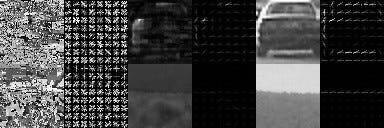
Feature extraction is the key step in building a vehicle detection pipeline. There are a variety of tools that can extract vehicle features that we can use to differentiate vehicles from non-vehicles, including neural networks and gradient thresholds. This post provides a practical guide to using a histogram of oriented gradients (HOG) to extract features. In particular, the examination of different color spaces is of interest:
“Here, we see a decent difference in S and V channel, but not much in the H channel. So maybe in terms of color histogram, RGB and the S & V channel of HSV are looking good.”
The program covers deep neural networks, convolutional neural networks, transfer learning, and other sophisticated topics. But some students want to go even beyond what we cover in the course.
Here are blog posts from three students who love neural networks and found their own ways to have fun with them.
Oliver dives into the guts of his desktop machine to figure out what components he needs to upgrade for a killer deep learning machine. He says to focus on the GB/s memory throughput of the GPU.
Here’s Oliver’s take on GPU options:
“Nvidia is betting big for Machine Learning with its CUDA parallel computing architecture and platform. Nothing against other manufacturers, but for ML, this is the one to go. Ignore the Quadro commercial line, to get good performance look for GTX 900 or higher. The recommendations I had were always for the GTX 1060 or higher.”
MiniFlow is a toy neural network library that my colleague Dom Luna built for the Udacity Self-Driving Car Program. We walk students through the code in order to teach them how neural networks work. Udacity student Peter Tempfli ported MiniFlow from Python to JavaScript!
Here’s what Peter learned:
“Every network has an optional point, where it returns the lowest error value. We want to move our input parameters to the direction of this optional point. Let’s model a function with a ‘valley’, and the current x,y point with the position of the ‘ball’. In order to move the ball to the lowest point of the ‘valley’, we need to adjust the w parameter in the direction of steepest line. The point here is that there is only one ‘best’ direction — this is the gradient for the given point.”
TensorFlow is the core deep learning library that students learn in the Udacity Self-Driving Car Program. It’s Google’s deep learning library, and it’s quickly taking over the machine learning world. Udacity student Krishna Sankar went to the latest TensorFlow Dev Summit, and reports back:
“The “Layers” layer makes it easier to construct models directly from neural network concepts without a lot of impedance. This is where Keras filled a vacuum.”
Udacity believes in project-based education. Our founder, Sebastian Thrun, likes to say that you don’t lose weight by watching other people exercise. You have to write the code yourself!
The goal of this project is for students to build a neural network that “learns” how to drive a car like a human. Here’s how it works:
First, each student records his or her own driving behavior by driving the car around a test track in the Udacity simulator.
Then, each student uses this data to train a neural network to drive the car around the track autonomously.
There are all sorts of neat ways to approach this problem, and it seems like Udacity students tried all of them! Here are excerpts from—and links to—blog posts written by five of our Self-Driving Car students, each of whom takes a different approach to the project.
James Jackson’s post is a great overview of how to approach this project, and he adds a twist by implementing data smoothing. We didn’t cover data smoothing in the instructional material, so this is one of many examples of Udacity students going above and beyond the instructional material to build terrific projects.
“Recorded driving data contains substantial noise. Also, there is a large variation in throttle and speed at various instances. Smoothing steering angles (ex. SciPy Butterworth filter), and normalizing steering angles based on throttle/speed, are both investigated.”
This is a terrific post about the mechanics of building a behavioral cloning model. It really stands out for JC’s investigation of Gradient Activation Mappings to show how which pixels in an image have the most effect on the model’s output.
“The whole idea is to using heatmap to highlight locality areas contributing most to the final decision. It was designed for classification purpose, but with slight change, it can be applied to our steering angle predictions.”
This post has a great discussion of data augmentation techniques for neural network training, including randomly jittering data from the training set. Joshua used over 100,000 images for training!
“Though there was more than 100,000 training data, each epoch consisted of 24,064 samples. This made the training more tractable, and since we were using a generator, all of the training data was still used in training, however at different epochs.”
Sujay applied a number of different augmentations to his training data, including brightness and shadow augmentations. This helped his model generalize to a new, darker test track.
“The training samples brightness are randomly changed so as to have training data that closely represent various lighting conditions like night, cloudy, evening, etc.”
This post encourages students by showing how it’s possible to build a behavioral cloning model without tens of thousands of training images. The secret is to use side cameras and data augmentation.
“Just like anything we do, the longer we practice, the better we are good at it because we take in hour and hour of data into our brain memory/muscle memory. It’s the same here for neural net, the more variety of data you have to train your network, the better the model is at the task.”
As you can see from these examples, there is no one right way to approach a project like this, and there is a great deal of room for creativity. What should also be clear is that our students are incredible!
We’re very excited about the next projects on the horizon, and we look forward to sharing more amazing student work with you soon!