The “Convolutional Neural Networks” Lesson

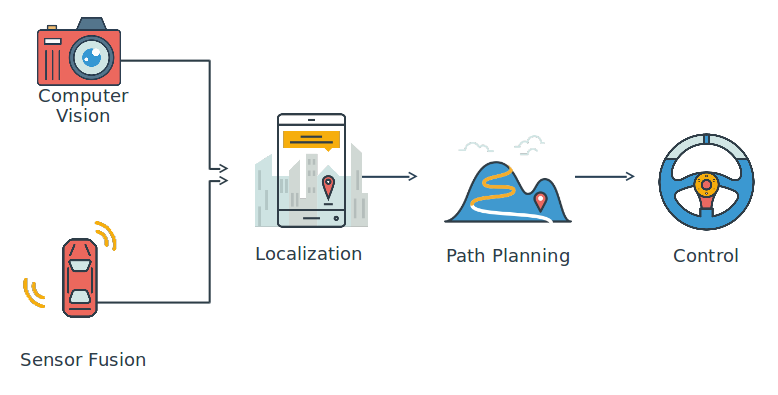
The 8th lesson of the Udacity Self-Driving Car Engineer Nanodegree program is “Convolutional Neural Networks.” This is where students learn to apply deep learning to camera images!

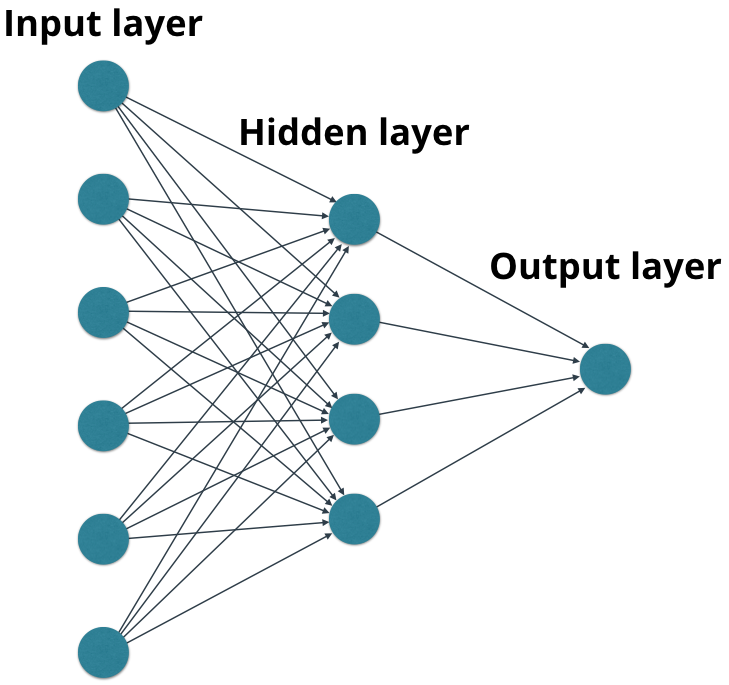
Convolutional neural networks (CNNs) are a special category of deep neural networks that are specifically designed to work with images. CNNs have multiple layers, with each layer connected to the next by “convolutions.”

In practice, what this means is that we slide a patch-like “filter” over the input layer, and the filter applies weights to each artificial neuron in the input layer. The filter connects to a single artificial neuron in the output layer, thereby connecting each neuron in the output layer to a small set of neurons from the input layer.

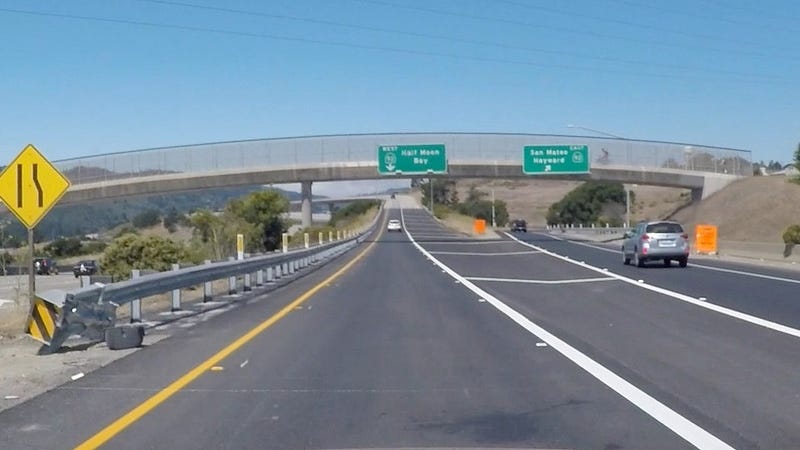
To make this more concrete, consider this photograph of a dog:

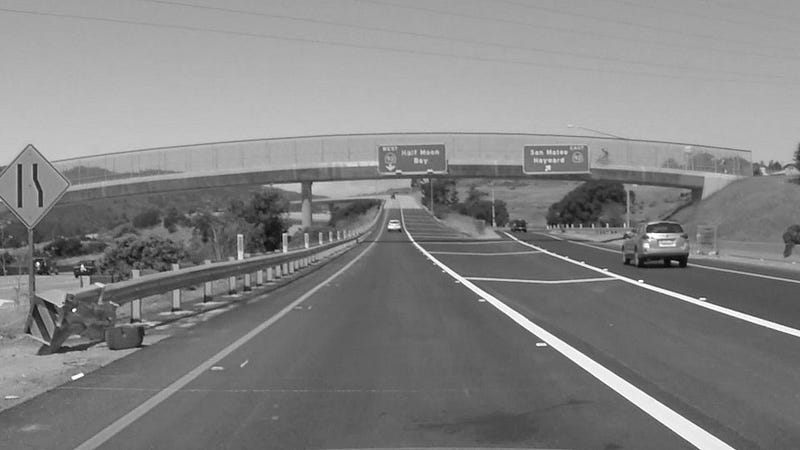
When we run this photograph through a CNN, we’ll slide a filter over the image:

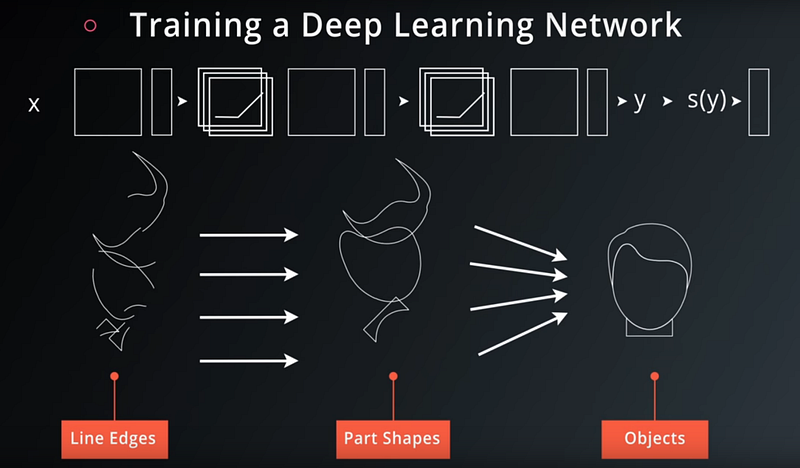
This filter will, broadly speaking, identify basic “features.” It might identify one frame as a curve, and another as a hole:

Curve
Hole

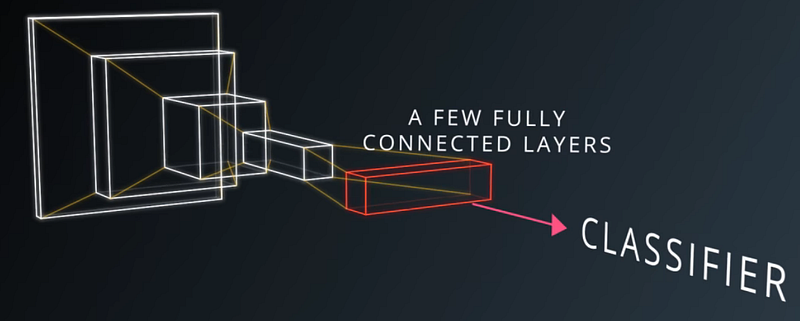
The next layer in the CNN would pass a different filter over a stack of these basic features, and identify more sophisticated features, like a nose:

Nose

The final layer of the CNN is responsible for classifying these increasingly sophisticated features as a dog.

This is of course simplified for the sake of explanation, but hopefully it helps to make the process clear.

One of the more vexing aspects of deep learning is that the actual “features” that a network identifies are not necessarily anything humans would think of as a “curve” or a “nose.” The network learns whatever it needs to learn in order to identify the dog most effectively, but that may not be anything humans can really describe well. Nonetheless, this description gets at the broad scope of how a CNN works.

Once students learn about CNNs generally, it’s time to practice building and training them with TensorFlow. As Udacity founder Sebastian Thrun says, “You don’t lose weight by watching other people exercise.” You have to write the code yourself!

The back half of the lesson covers some deep learning topics applicable to CNNs, like dropout and regularization.

The lesson ends with a lab in which students build and train LeNet, the famous network by Yann LeCun, to identify characters. This is a classic exercise for learning convolutional neural networks, and great way to learn the fundamentals.

Ready to start learning how to build self-driving cars yourself? Great! If you have some experience already, you can apply to our Self-Driving Car Engineer Nanodegree program here, and if you’re just getting started, then we encourage you to enroll in our Intro to Self-Driving Cars Nanodegree program here!

~

Thanks to my former colleague, Dhruv Parthasarathy, who built out this intuitive explanation in even greater detail as part of this lesson!

We’re also grateful to Vincent Vanhoucke, Principal Scientist at Google Brain, who teaches the free Udacity Deep Learning course, from which we drew for this lesson.

How Self-Driving Cars Work

Earlier this fall I spoke about how self-driving cars work at TEDxWilmington’s Transportation Salon, which was a lot of fun.

The frame for my talk was a collection of projects students have done as part of the Udacity Self-Driving Car Engineer Nanodegree Program.

So, how do self-driving cars work?

Glad you asked!

Self-driving cars have five core components:

  1. Computer Vision
  2. Sensor Fusion
  3. Localization
  4. Path Planning
  5. Control

Computer vision is how we use cameras to see the road. Humans demonstrate the power of vision by handling a car with basically just two eyes and a brain. For a self-driving car, we can use camera images to find lane lines, or track other vehicles on the road.

Sensor fusion is how we integrate data from other sensors, like radar and lasers—together with camera data—to build a comprehensive understanding of the vehicle’s environment. As good as cameras are, there are certain measurements — like distance or velocity — at which other sensors excel, and other sensors can work better in adverse weather, too. By combining all of our sensor data, we get a richer understanding of the world.

Localization is how we figure out where we are in the world, which is the next step after we understand what the world looks like. We all have cellphones with GPS, so it might seem like we know where we are all the time already. But in fact, GPS is only accurate to within about 1–2 meters. Think about how big 1–2 meters is! If a car were wrong by 1–2 meters, it could be off on the sidewalk hitting things. So we have much more sophisticated mathematical algorithms that help the vehicle localize itself to within 1–2 centimeters.

Path planning is the next step, once we know what the world looks like, and where in it we are. In the path planning phase, we chart a trajectory through the world to get where we want to go. First, we predict what the other vehicles around us will do. Then we decide which maneuver we want to take in response to those vehicles. Finally, we build a trajectory, or path, to execute that maneuver safely and comfortably.

Control is the final step in the pipeline. Once we have the trajectory from our path planning block, the vehicle needs to turn the steering wheel and hit the throttle or the brake, in order to follow that trajectory. If you’ve ever tried to execute a hard turn at a high speed, you know this can get tricky! Sometimes you have an idea of the path you want the car to follow, but actually getting the car to follow that path requires effort. Race car drivers are phenomenal at this, and computers are getting pretty good at it, too!

The video at the beginning of this post covers similar territory, and I hope between that, and what I’ve written here, you have a better sense of how Self-Driving Cars work.

Ready to start learning how to do it yourself? Apply for our Self-Driving Car Engineer Nanodegree program, or enroll in our Intro to Self-Driving Cars Nanodegree program, depending on your experience level, and let’s get started!

The “Deep Neural Networks” Lesson

Lesson 7 of the Udacity Self-Driving Car Engineer Nanodegree Program is “Deep Neural Networks”

I am continuing on my quest to write a post detailing every one of the 67 projects that currently comprise our Self-Driving Car Engineer Nanodegree program curriculum, and today, we look at the “Deep Neural Networks” lesson!

Students actually start learning about deep neural networks prior to this lesson, but this is the lesson where students begin to implement deep neural networks in TensorFlow, Google’s deep learning framework.

In the previous lesson, “Introduction to TensorFlow,” students learned to use TensorFlow to build linear models, like linear or logistic regression. In the “Deep Neural Networks” lesson, students learn new techniques in TensorFlow, to build up these models into neural networks.

Some of the most important foundational blocks of neural networks are demonstrated in TensorFlow.

  • Activation functions help neural networks represent non-linear models
  • Backpropagation trains neural networks from real data quickly and efficiently
  • Dropout removes neurons randomly during training to prevent overfitting the training data, which makes the model more accurate on new data

Students also learn some practical skills, like how to save and restore models in TensorFlow.

Future lessons take these basic skills and help students apply them to important problems for autonomous vehicles, like how to recognize traffic signs.

The “MiniFlow” Lesson

Exploring how to build a Self-Driving Car, step-by-step with Udacity!

Editor’s note: David Silver (Program Lead for Udacity’s Self-Driving Car Engineer Nanodegree program), continues his mission to write a new post for each of the 67 lessons currently in the program. We check in with him today as he introduces us to Lesson 5!

The 5th lesson of the Udacity Self-Driving Car Engineer Nanodegree Program is “MiniFlow.” Over the course of this lesson, students build their own neural network library, which we call MiniFlow.

The lesson starts with a fairly basic, feedforward neural network, with just a few layers. Students learn to build the connections between the artificial neurons and implement forward propagation to move calculations through the network.

A feedforward network.

The real mind-bend comes in the “Linear Transform” concept, where we go from working with individual neurons to working with layers of neurons. Working with layers allows us to dramatically accelerate the calculations of the networks, because we can use matrix operations and their associated optimizations to represent the layers. Sometimes this is called vectorization, and it’s a key to why deep learning has become so successful.

Once students implement layers in MiniFlow, they learn about a particular activation function: the sigmoid function. Activation functions define the extent to which each neuron is “on” or “off”. Sophisticated activation functions, like the sigmoid function, don’t have to be all the way “on” or “off”. They can hold a value somewhere along the activation function, between 0 and 1.

The sigmoid function.

The next step is to train the network to better classify our data. For example, if we want the network to recognize handwriting, we need to adjust the weight associated with each neuron in order to achieve the correct classification. Students implement an optimization technique called gradient descent to determine how to adjust the weights of the network.

Gradient descent, or finding the lowest point on the curve.

Finally, students implement backpropagation to relay those weight adjustments backwards through the networks, from finish to start. If we do this thousands of times, hopefully we’ll wind up with a trained, accurate network.

And once students have finished this lesson, they have their own Python library they can use to build as many neural networks as they want!

If all of that sounds interesting to you, maybe you should apply to join the Udacity Self-Driving Car Engineer Nanodegree Program and learn to become a Self-Driving Car Engineer!

Training Self-Driving Car Engineers in India

Udacity and Infosys partner to teach autonomous technology!

Udacity and Infosys just announced a partnership to train hundreds of Infosys’ top software engineers in autonomous vehicle development.

Quoting Infosys President Ravi Kumar:

Udacity and Infosys are uniting the elements of education and transformative technology in this one-of-a-kind program. Trainees, with the first 100 selected through a global hackathon in late November, will immerse themselves in autonomous technology courses that require hands-on training to simulate real-life scenarios. By the end of 2018, Infosys will have trained 500 employees on the spectrum of technologies that go into building self-driving vehicles, and in doing so will help to evolve the future of transportation for drivers, commuters and even mass transit systems.

And Udacity CEO Vishal Makhijani:

This program will be part of Udacity Connect, which is Udacity’s in-person, blended learning program. Infosys engineers from around the world will participate in Udacity’s online Self-Driving Car Engineer Nanodegree program, and combine one term of online studies with two terms of being physically located together at the Infosys Mysore training facility, where the program will be facilitated by an in-person Udacity session lead.

Two aspects of this partnership are particularly exciting for me. One is simply working with a top technology company like Infosys. When we started building the Nanodegree program, our objective was to “become the industry standard for training self-driving car engineers.” This partnership moves us significantly closer to that objective. We are grateful and excited for the opportunity, and thrilled for the participating engineers.

The other exciting aspect of this partnership is that it will happen in India. The Infosys engineers will fly in from all over the world, but there is something special about conducting the program in Mysore.

For many years autonomous vehicle development has happened in just a few places: Detroit, Pittsburgh, southern Germany. Recently, we’ve seen autonomous vehicle development expand to Silicon Valley, Japan, Israel, various parts of Europe, Singapore, and beyond. Training autonomous vehicle engineers in India expands the opportunities for students worldwide.

7% of students in the Udacity Self-Driving Car Engineer Nanodegree program are from India. The Infosys partnership is an important next step in building a robust pipeline of job opportunities for our students on the subcontinent.

Dominik Nuss at Mercedes-Benz

One of the world-class experts in our Self-Driving Car Engineer Nanodegree program!

Me and Andrei Vatavu and Dominik Nuss

One of the delights of teaching at Udacity is the opportunity to work with world-class experts who are excited about sharing their knowledge with our students.

We have the great fortune of working with Mercedes-Benz Research and Development North America (MBRDNA) to build the Self-Driving Car Engineer Nanodegree Program. In particular, we get to work with Dominik Nuss, principal engineer on their sensor fusion team.

In these two videos, Dominik explains how unscented Kalman filters fuse together data from multiple sensors across time:

These are just a small part of a much larger unscented Kalman filter lesson that Dominik teaches. This is an advanced, complex topic I haven’t seen covered nearly as well anywhere else.

MBRDNA has just published a terrific profile of Dominik, along with a nifty video of him operating one of the Mercedes-Benz autonomous vehicles.

Read the whole thing and learn what it’s like to work on one of the top teams in the industry. Then, enroll in our program (if you haven’t already!), and start building your OWN future in this amazing field!

The “Finding Lane Lines” Project

Udacity Self-Driving Car Engineer Nanodegree program

The second lesson of the Udacity Self-Driving Car Nanodegree program is actually a lesson followed by a project. In “Finding Lane Lines”, my colleague Ryan Keenan and I teach students how to use computer vision to extract lane lines from a video of a car driving down the road.

Students are able to use this approach to find lane lines within the first week of the Nanodegree program! This isn’t the only way to find lane lines, and with modern machine learning algorithms it’s no longer the absolute best way to find lane lines. But it’s pretty effective, and it’s amazing how quickly you can get going with this approach.

Here’s a photo of Interstate 280, taken from Carla, Udacity’s own self-driving car:

The first thing we’re going to do is convert the image to grayscale, which will make it easier to work with, since we’ll only have one color channel:

Next, we’ll perform “Canny edge detection” to identify edges in the image. An edge is place where the color or intensity of the image changes sharply:

Now that we have the edges of the image identified, we can use a technique called a “Hough transform” to find lines in the image that might be the lane lines we are looking for:

All of these tools have various parameters we can tune: how sharp should the edges be, how long should the lines be, what should the slope of the line be. If we tune the parameters just right, we can get a lock on our lane lines:

Apply these lane lines to the original image, and you get something like this “Finding Lane Lines” project, submitted by our student Jeremy Shannon:

Pretty awesome for the first week!

The “Welcome” Lesson

Udacity Self-Driving Car Engineer Nanodegree program

“Welcome” is the first of 20 lessons in Term 1 of the Udacity Self-Driving Car Engineer Nanodegree program.

This is an overview lesson in which we introduce:

We also cover the history of self-driving cars, the logistics of how Udacity and this Nanodegree program work, and the projects that students will build throughout the program.

I’ll let Sebastian share that last bit:

Next up, the “Finding Lane Lines” project!

Blogging the Udacity Self-Driving Car Engineer Nanodegree Program

Carla, the Udacity Self-Driving Car!

For the last year and a quarter, I’ve been working with a team at Udacity to build the Self-Driving Car Engineer Nanodegree program. This is a nine-month program that prepares software engineers for jobs working on autonomous vehicles.

Over the coming weeks and months, I’m going to produce a new post about each of the lessons in the Nanodegree program, to help you explore what you can learn. As of right now, there are 67 lessons, so I anticipate this process will take me several months to complete. But I’m excited to spend time reviewing and sharing what we’ve built!

During our program we cover: computer vision, deep learning, sensor fusion, localization, path planning, control, advanced electives, and finally system integration. In the final part of the program, students even get to put their own code on Carla, Udacity’s actual self-driving car.

I’ll start today with a quick post about our 1st lesson, which is entitled: “Welcome”.

How the Udacity Self-Driving Car Works

At Udacity, where I work, we have a self-driving car. Her name is Carla.

Carla’s technology is divided into four subsystems: sensors, perception, planning, and control.

Sensors

Carla’s sensor subsystem encompasses the physical hardware that gathers data about the environment.

For example, Carla has cameras mounted behind the top of the windshield. There are usually between one and three cameras lined up in a row, although we can add or remove cameras as our needs change.

Carla also has a single front-facing radar, embedded in the bumper, and one 360-degree lidar, mounted on the roof.

This is what a lidar sensor looks like, and this is what lidar data looks like. It’s a point cloud.

Sometimes Carla will utilize other sensors, too, like GPS, IMU, and ultrasonic sensors.

Data from these sensors flows into various components of the perception subsystem.

Perception

Carla’s perception subsystem translates raw sensor data into meaningful intelligence about her environment. The components of the perception subsystem can be grouped into two blocks: detection and localization.

The detection block uses sensor information to detect objects outside the vehicle. These detection components include traffic light detection and classification, object detection and tracking, and free space detection.

The localization block determines where the vehicle is in the world. This is harder than it sounds. GPS can help, but GPS is only accurate to within 1–2 meters. For a car, a 1–2 meter error range is unacceptably large. A car that thinks it’s in the center of a lane could be off by 1–2 meters and really be on the sidewalk, running into things. We need to do a lot better than the 1–2 meters of accuracy that GPS provides.

Fortunately, we can localize Carla to within 10 centimeters or less, using a combination of high-definition maps, Carla’s own lidar sensor, and sophisticated mathematical algorithms. Carla’s lidar scans the environment, compares what it sees to a high-definition map, and then determines a precise location.

Carla localizes herself by figuring out where she is on a high-definition map.

The components of the perception subsystem route their output to the planning subsystem.

Planning

Carla has a straightforward planning subsystem. The planner builds a series of waypoints for Carla to follow. These waypoints are just spots on the road that Carla needs to drive over.

Each waypoint has a specific location and associated target velocity that Carla should match when she passes through that waypoint.

Carla’s planner uses the perception data to predict the movements of other vehicles on the road and update the waypoints accordingly.

For example, if the planning subsystem were to predict that the vehicle in front of Carla would be slowing down, then Carla’s own planner would likely decide to decelerate.

The final step in the planning process would be for the trajectory generation component to build new waypoints that have slower target velocities, since in this example Carla would be slowing down as she passes through the upcoming waypoints.

Similar calculations affect how the planning subsystem treats traffic lights and traffic signs.

Once the planner has generated a trajectory of new waypoints, this trajectory is passed to the final subsystem, the control subsystem.

Control

The control subsystem actuates the vehicle by sending acceleration, brake, and steering messages. Some of these messages are purely electronic, and others have a physical manifestation. For example, if you ride in Carla, you will actually see the steering wheel turn itself.

The control subsystem takes as input the list of waypoints and target velocities generated by the planning subsystem. Then the control subsystem passes these waypoints and velocities to an algorithm, which calculates just how much to steer, accelerate, or brake, in order to hit the target trajectory.

There are many different algorithms that the control subsystem can use to map waypoints to steering and throttle commands. These different algorithms are called, appropriately enough, controllers.

Carla uses a fairly simple proportional-integral-derivative (PID) controller, but more sophisticated controllers are possible.

A Self-Driving Car

That’s how Carla works!

First, the sensor subsystem collects data from Carla’s cameras, radar, and lidar. The perception subsystem uses that sensor data to detect objects in the world and localize the vehicle within its environment. Next, the planning subsystem uses that environmental data to build a trajectory for Carla to follow. Finally, the control system turns the steering wheel and fires the accelerator and brake in order to move the car along that trajectory.

We’re very proud of Carla. She’s driven from Mountain View to San Francisco, and done lots of driving on our test track.

The most exciting thing about Carla is that every Udacity student gets to load their code onto her computer at the end of the Nanodegree Program and see how well she drives on our test track.

If you’re interested in learning about how to program self-driving cars, and you want to try out driving Carla yourself, you should sign up for the Udacity Self-Driving Car Engineer Nanodegree Program!