Udacity democratizes education by bringing world-class instruction to students around globe. Often, we’re humbled to see how students build on that education to create their own projects outside of the classroom.
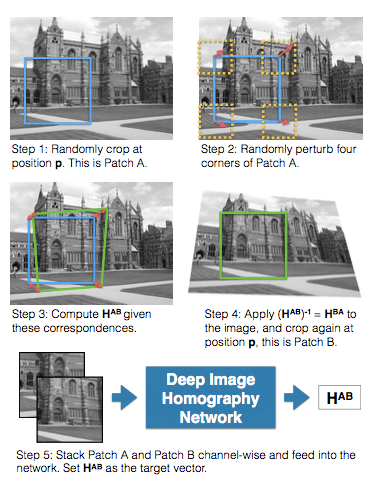
Mez starts off with a plain-English explanation of what isomorphism and homography are. Homography is basically the study of how one object can look different when viewed from different places. Think about how your image of a car changes when you take a step to the left and look at it again.
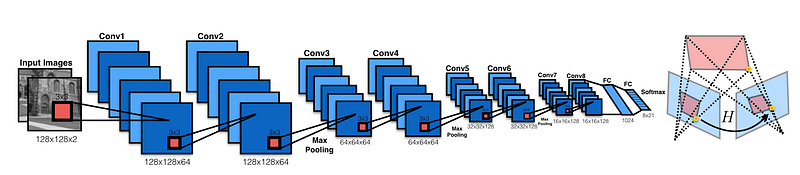
After the conceptual explanation, Mez dives into the mechanics of how to combine computer vision, image processing, and deep learning to train a VGG-style network to perform homography.
I imagine this could be a useful technique for visual localization, as it helps you stitch together different images into a larger map.
“HomographyNet is a VGG style CNN which produces the homography relating two images. The model doesn’t require a two stage process and all the parameters are trained in an end-to-end fashion!”
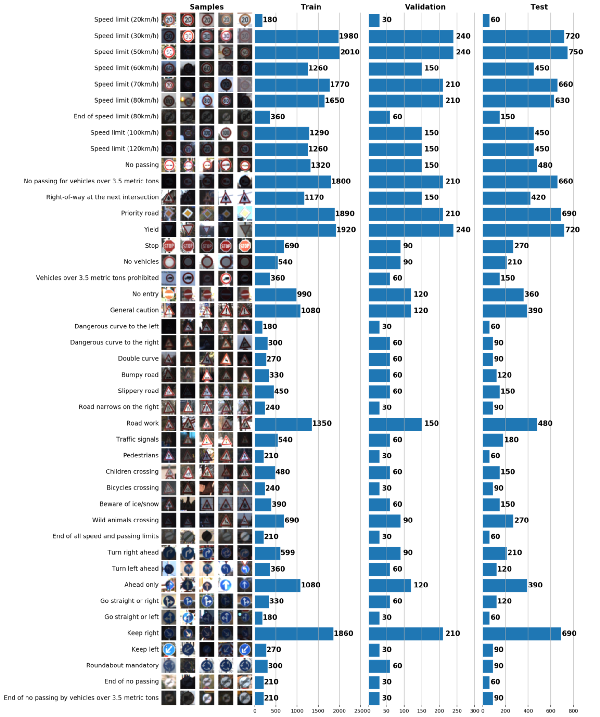
Kirill uses the Traffic Sign Classifier Project from the Nanodegree Program as a jumping off point for discussing approaches to image pre-processing. He covers three approaches: visualization, scikit-learn, and data augmentation. Critical topics for any perception engineer!
“Convnets cannot be fed with “any” data at hand, neither they can be viewed as black boxes which extract useful features “automagically”. Bad to no preprocessing can make even a top-notch convolutional network fail to converge or provide a low score. Thus, image preprocessing and augmentation (if available) is highly recommended for all networks.”
We teach students in the Nanodegree Program how to use Amazon Web Services to launch a virtual server with a GPU, which accelerates training neural networks. There are alternatives, though, and Steve does a great job explaining how you would accomplish the same thing using Google Cloud Platform.
“Good news: if it’s your first time using Google Cloud you are also eligible for $300 in credits! In order to get this credit, click on the big blue button “Sign up for free trial” in the top bar.”
Vivek has written terrific posts on a variety of neural network architectures. In this post, which is the first in a series, he prepares YOLO v2 to classify KITTI data. He goes over six pre-processing steps: learning bounding boxes, preprocessing the ground truth bounding boxes, preprocessing the ground truth labels, overfitting an initial network (a Vivek specialty), data augmentation, and transfer learning.
“ YOLOv2 has become my go-to algorithm because the authors correctly identified majority of short comings of YOLO model, and made specific changes in their model to address these issues. Futher YOLOv2 borrows several ideas from other network designs that makes it more powerful than other models like Single Shot Detection.”
Sachin has built an 18 lesson curriculum for deep learning, hosted via GitHub, called DeepSchool.io. The lessons start with the math of deep learning, take students through building feedforward and convolutional networks, and finish with using LSTMs to classify #FakeNews! Yay, 21st century America.
“Better reinforcement learning / integration of deep learning and reinforcement learning. Reinforcement learning algorithms that can reliably learn how to control robots, etc.”
To a large extent, this depends on how well we can map features and performance from a simulator (where we would perform reinforcement learning) to the real world. So far, this has been a challenge, but I’ve seen several companies recently working on this problem.
The other seven items on the list are all worth a read, too.
In just a few days, we‘re going to begin releasing Term 3 of the Udacity Self-Driving Car Engineer Nanodegree Program, and we could not be more excited! This is the final term of a nine-month Nanodegree program that covers the entire autonomous vehicle technology stack, and as such, it’s the culmination of an educational journey unlike any other in the world.
When you complete Term 3 and graduate from this program, you will emerge with an amazing portfolio of projects that will enable you to launch a career in the autonomous vehicle industry, and you will have gained experience and skills that are virtually impossible to acquire anywhere else. Some of our earliest students, like George Sung, Robert Ioffe, and Patrick Kern, have already started their careers in self-driving cars, and we’re going to help you do the same!
Term 3
This term is three months long, and features a different module each month.
The first month focuses on path planning, which is basically the brains of a self-driving car. This is how the vehicle decides where to go and how to get there.
The second month presents an opportunity to specialize with an elective; this is your chance to delve deeply into a particular topic, and emerge with a unique degree of expertise that could prove to be a key competitive differentiator when you enter the job market. We want your profile to stand out to prospective employers, and specialization is a great way to achieve this.
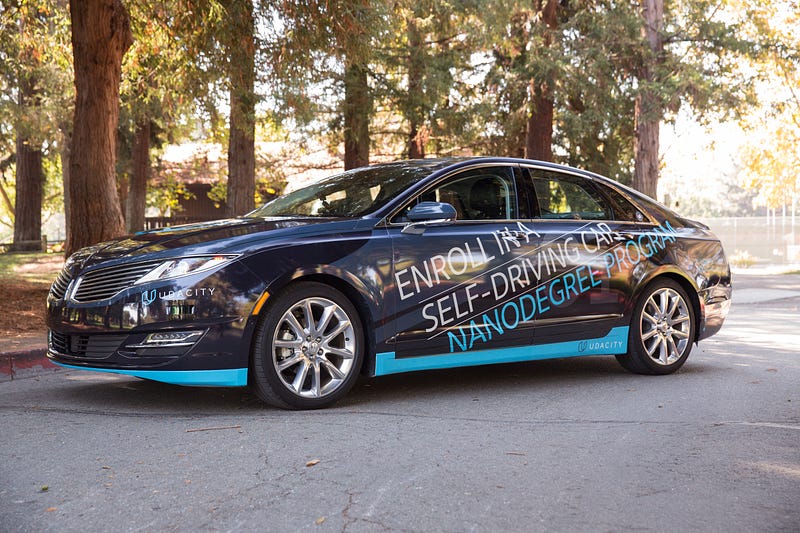
The final month is truly an Only At Udacity experience. In this System Integration Module, you will get to put your code on Udacity’s very own self-driving car! You’ll get to work with a team of students to test out your skills in the real world. We know firsthand from our hiring partners in the autonomous vehicle space that this one of the things they value most in Udacity candidates; the combination of software skills and real-world experience.
Month 1: Path Planning
Path planning is the brains of a self-driving car. It’s how a vehicle decides how to get where it’s going, both at the macro and micro levels. You’ll learn about three core components of path planning: environmental prediction, behavioral planning, and trajectory generation.
Best of all, this module is taught by our partners at Mercedes-Benz Research & Development North America. Their participation ensures that the module focuses specifically on material job candidates in this field need to know.
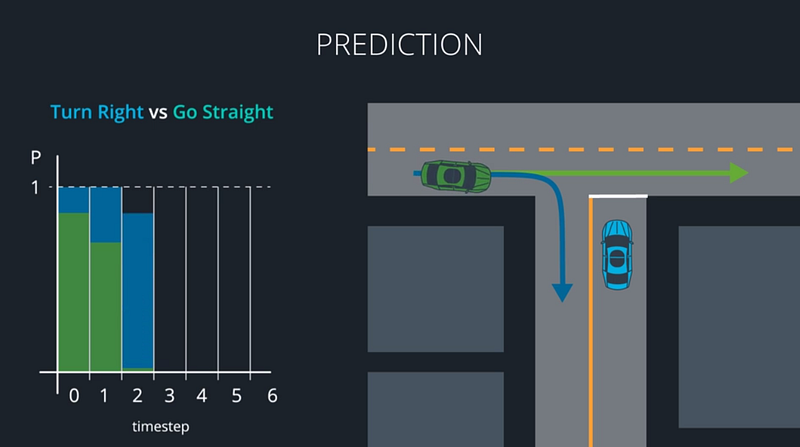
Path Planning Lesson 1: Environmental Prediction
In the Prediction Lesson, you’ll use model-based, data-driven, and hybrid approaches to predict what other vehicles around you will do next. Model-based approaches decide which of several distinct maneuvers a vehicle might be undertaking. Data-driven approaches use training data to map a vehicle’s behavior to what we’ve seen other vehicles do in the past. Hybrid approaches combine models and data to predict where other vehicles will go next. All of this is crucial for making our own decisions about how to move.
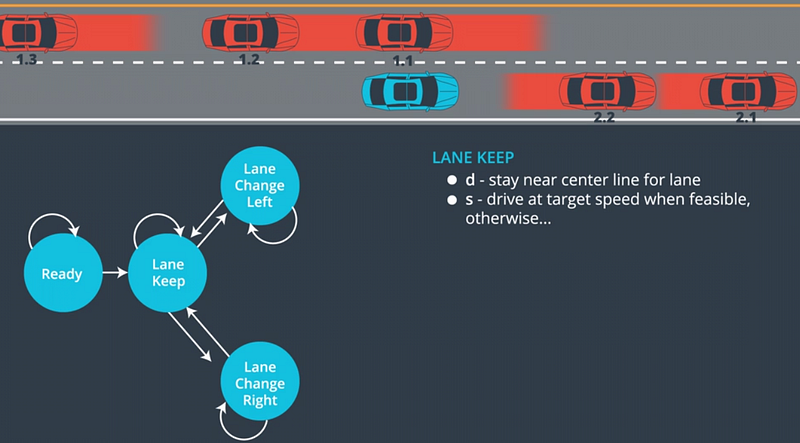
Path Planning Lesson 2: Behavior Planning
At each step in time, the path planner must choose a maneuver to perform. In the Behavior Lesson, you’ll build finite-state machines to represent all of the different possible maneuvers your vehicle could choose. Your FSMs might include accelerate, decelerate, shift left, shift right, and continue straight. You’ll then construct a cost function that assigns a cost to each maneuver, and chooses the lowest-cost option.
Path Planning Lesson 3: Trajectory Generation
Trajectory Generation is taught by Emmanuel Boidot, from Mercedes-Benz’s Vehicle Intelligence team.
In the Trajectory Lesson, you’ll use C++ and the Eigen linear algebra library to build candidate trajectories for the vehicle to follow. Some of these trajectories might be unsafe, others might simply be uncomfortable. Your cost function will guide you to the best available trajectory for the vehicle to execute.
Path Planning Project: Highway Path Planner
Using the newest release of the Udacity simulator, you’ll build your very own path planner and put it to the test on the highway. Tie together your prediction, behavior, and trajectory engines from the previous lessons to create an end-to-end path planner that drives the car in traffic!
Month 2: Electives
Term 3 will launch with two electives: Advanced Deep Learning, and Functional Safety. We’ve selected these based on feedback from our hiring partners, and we’re very excited to give students the opportunity to gain deep knowledge in these topics.
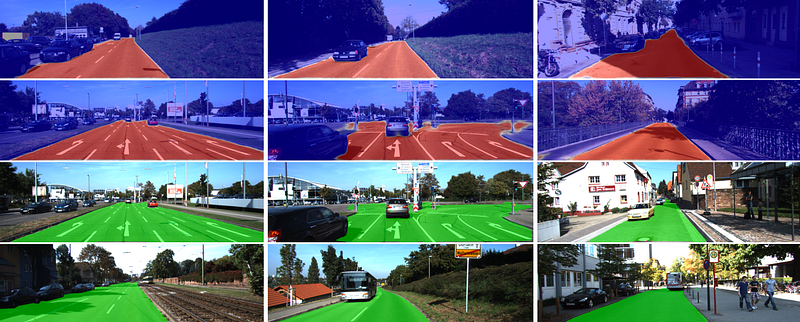
This module covers semantic segmentation, and inference optimization. Both of these topics are active areas of deep learning research.
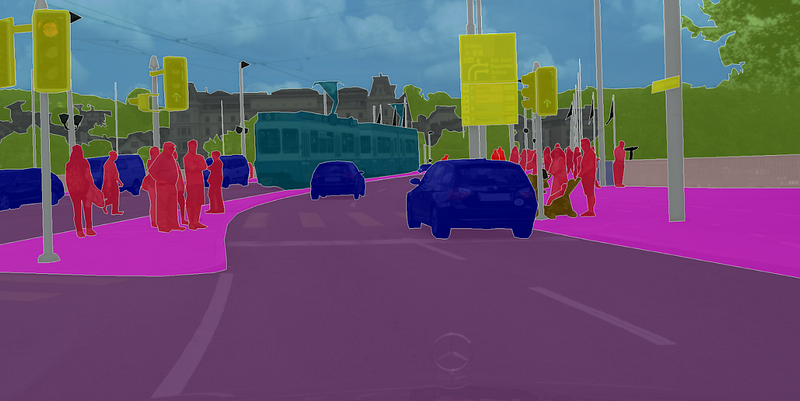
Semantic segmentation identifies free space on the road at pixel-level granularity, which improves decision-making ability. Inference optimizations accelerate the speed at which neural networks can run, which is crucial for computational-intense models like the semantic segmentation networks you’ll study in this module.
Advanced Deep Learning Lesson 1: Fully Convolutional Networks
In this lesson, you’ll build and train fully convolutional networks that output an entire image, instead of just a classification. You’ll implement three special techniques that FCNs use: 1×1 convolutions, upsampling, and skip layers, to train your own FCN models.
Advanced Deep Learning Lesson 2: Scene Understanding
In this lesson, you’ll learn the strengths and weaknesses of bounding box networks, like YOLO and Single Shot Detectors. Then you’ll go a step beyond bounding box networks and build your own semantic segmentation networks. You’ll start with canonical models like VGG and ResNet. After removing their final, fully-connected layers, you can add the three special techniques you’ve already practiced: 1×1 convolutions, upsampling, and skip layers. Your result will be an FCN that classifies each road pixel in the image!
Advanced Deep Learning Lesson 3: Inference Optimizations
One of the challenges of semantic segmentation is that it requires a lot of computational power. In this lesson, you’ll learn how to accelerate network performance in production, using techniques such as fusion, quantization, and reduced precision.
Advanced Deep Learning Project: Semantic Segmentation
In the project at the end of the Advanced Deep Learning Module, you’ll build a semantic segmentation network to identify free space on the road. You’ll apply your knowledge of fully convolutional networks and their special techniques to create a semantic segmentation model that classifies each pixel of free space on the road. You’ll accelerate the network’s performance using inference optimizations like fusion, quantization, and reduced precision. You’ll be studying and implementing approaches used by top performers in the KITTI Road Detection Competition!
Month 2 Elective: Functional Safety
Together with Elektrobit, we’ve built a fun and comprehensive Functional Safety Module.
You’ll learn functional safety frameworks to ensure that vehicles is safe, both at the system and component levels.
Functional Safety Lesson 1: Introduction
You’ll build a functional safety case with Dheeraj, Stephanie, and Benjamin from Elektrobit.
In this lesson, Elektrobit’s experts will guide you through the high-level steps that the ISO 26262 standard requires for building a functional safety case. ISO 26262 is the world-recognized standard for automotive functional safety. Understanding the requirements of this standard gets you started on mastering a crucial field of autonomous vehicle development.
Functional Safety Lesson 2: Safety Plan
In this lesson, you’ll build a safety plan for a lane-keeping assistance feature. You’ll start with the same template that Elektrobit functional safety managers use, and add the information specific to your feature.
Functional Safety Lesson 3: Hazard Analysis and Risk Assessment
You’ll complete a hazard analysis and risk assessment for the lane-keeping assistance feature. As part of the HARA, you’ll brainstorm how the system might fail, including the operational mode, environmental details, and item usage of each hypothetical scenario. Your HARA will record the issues to monitor in your functional safety analysis.
You’ll translate high-level functional safety concept requirements into technical safety concept requirements that dictate specific performance parameters. At this point you’ll have concrete constraints for the system.
Functional Safety Lesson 6: Software and Hardware
Functional safety includes specific rules on how to implement hardware and software. In this lesson, you’ll learn about spatial, temporal, and communication interference, and how to guard against them. You’ll also review MISRA C++, the most common set of rules for writing C++ for automotive systems.
Functional Safety Project: Safety Case
You’ll use the guidance from your lessons to construct an end-to-end safety case for a lane departure warning feature. You’ll begin with the hazard analysis and risk assessment, and create further documentation for functional and technical safety concepts, and finally software and hardware requirements. Analyzing and documenting system safety is critical for autonomous vehicle development. These are skills that often only experienced automotive engineers possess!
System Integration
System integration is the final module of the Nanodegree program, and it’s the month where you actually get to put your code on the Udacity Self-Driving Car!
You’ll learn about the software stack that runs on “Carla,” our self-driving vehicle. Over the course of the final month of the program, you will work in teams to integrate software components, and get the car to drive itself around the Udacity test track.
Vehicle Subsystems
This lesson walks you through Carla’s key subsystems: sensors, perception, planning, and control. Eventually you’ll need to integrate software modules with these systems so that Carla can navigate the test track.
ROS and Autoware
Carla runs on two popular open-source automotive libraries: ROS and Autoware. In this lesson you’ll practice implementing ROS nodes and Autoware modules.
System Integration
During the final lesson of the program, you’ll integrate ROS nodes and Autoware modules with Carla’s software development environment. You’ll also learn how to transfer the code to the vehicle, and resolve issues that arise on real hardware, such as latency, dropped messages, and process crashing.
Project: Carla
This is the capstone project of the Nanodegree program! You will work with a team of students to integrate the skills you’ve developed over the last nine months. The goal is to build Carla’s software environment to successfully navigate Udacity’s test track.
When you complete Term 3, you will graduate from the program, and earn your Udacity Self-Driving Car Engineer Nanodegree credential. You will be ready to work on an autonomous vehicle team developing groundbreaking self-driving technology, and you will join a rarefied community of professionals who are committed to a world made better through this transformational technology.
The ultimate goal of FCNs is to produce “semantic segmentation”. This is an output that is the same size as the original input image, and roughly resembles the original input image, but in which each pixel in the image is colored one of C colors, where C is the number of classes we are segmenting.
For a road image, this could be as simple as C=2 (“road”, or “not road”). Or C could capture a much richer class set.
An example of semantic segmentation from the KITTI dataset.
Fully Convolutional
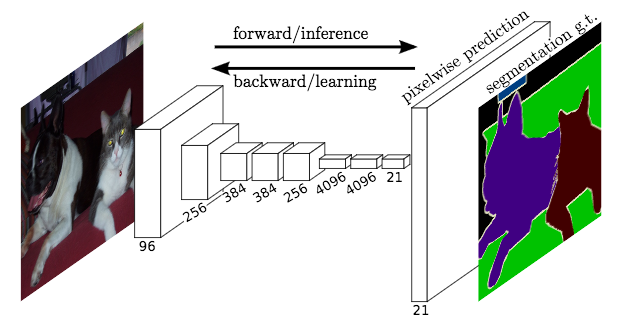
The basic idea behind a fully convolutional network is that it is “fully convolutional”, that is, all of its layers are convolutional layers.
FCNs don’t have any of the fully-connected layers at the end, which are typically use for classification. Instead, FCNs use convolutional layers to classify each pixel in the image.
So the final output layer will be the same height and width as the input image, but the number of channels will be equal to the number of classes. If we’re classifying each pixel as one of fifteen different classes, then the final output layer will be height x width x 15 classes.
Using a softmax probability function, we can find the most likely class for each pixel.
Learnable Upsampling
A logistical hurdle to overcome in FCNs is that the intermediate layers typically get smaller and smaller (although often deeper), as striding and pooling reduce the height and width dimensions of the tensors.
FCNs use “deconvolutions”, or essentially backwards convolutions, to upsample the intermediate tensors so that they match the width and height of the original input image.
Justin Johnson has a pretty good visual explanation of deconvolutions (start at slide 46 here).
Because backward convolution layers are just convolutions, turned around, their weights are learnable, just like normal convolutional layers.
Smart.
Combining Layers
The authors had success converting canonical networks like AlexNet, VGG, and GoogLeNet into FCNs by replacing their final layers. But there was a consistent problem, which was that upsampling from the final convolutional tensor seemed to be inaccurate. Too much spatial information had been lost by all the downsampling in the network.
So they combined upsampling from that final intermediate tensor with upsampling from earlier tensors, to get more precise spatial information.
I thought I’d try to summarize it, mostly as an exercise in trying to understand the paper myself.
Background
This paper appears to originate out of the lab of Raquel Urtasun, the University of Toronto professor who just joined Uber ATG. Prior to Uber, Urtasun compiled the KITTI benchmark dataset.
Right now, MultiNet sits at 15th place on the leaderboard, but it’s the top entry that’s been formally written up in an academic paper.
Goals
Interestingly, the goal of MultiNet is exactly to win the KITTI Lane Detection competition. Rather, it’s to train a network that can segment the road quickly, in real-time. Adding complexity, the network also detects and classifies vehicles on the road.
¿Por qué no?
Architecture
The MultiNet architecture is three-headed. The beginning of the network is just VGG16, without the three fully connected layers at the end. This part of the network is the “encoder” part of the standard encoder-decoder architecture.
Conceptually, the “CNN Encoder” reduces each input image down to a set of features. Specifically, 512 features, since the output tensor (“Encoded Features”) of the encoder is 39x12x512.
For each region of an input image, this Encoded Features tensor captures a measure of how strongly each of 512 features is represented in that region.
Since this is a neural network, we don’t really know what these features are, and they may not even really be things we can explain. It’s just whatever things the network learns to be important.
The three-headed outputs are more complex.
Classification: Actually, I just lied. This output head is pretty straightforward. The network applies a 1×1 convolution to the encoded features (I’m not totally sure why), then adds a fully connected layer and a softmax function. Easy.
(Update: Several commenters have added helpful explanations of 1×1 convolutional layers. My uncertainty was actually more about why MultiNet adds a 1×1 convolutional layer in this precise place. After chewing on it, though, I think I understand. Basically, the precise features encoded by the encoder sub-network may not be the best match for classification. Instead, the classification output perform best if the shared features are used to build a new set of features that is specifically tuned for classification. The 1×1 convolutional layer transforms the common encoded features into that new set of features specific to classification.)
Detection: This output head is complicated. They say it’s inspired by Yolo and Faster-RCNN, and involves a series of 1×1 convolutions that output a tensor that has bounding box coordinates.
Remember, however, the encoded features only have dimensions 39×12, while the original input image is a whopping 1248×384. Apparently 39×12 winds up being too small to produce accurate bounding boxes. So the network has “rezoom layers” that combine the first pass at bounding boxes with some of the less down-sampled VGG convolutional outputs.
The result is more accurate bounding boxes, but I can’t really say I understand how this works, at least on a first readthrough.
Segmentation: The segmentation output head applies fully-convolutional upsampling layers to blow up the encoded features from 39x12x512 back to the original image size of 1248x312x2.
The “2” at the end is because this head actually outputs a mask, not the original image. The mask is binary and just marks each pixel in the image as “road” or “not road”. This is actually how the network is scored for the KITTI leaderboard.
Training
The paper includes a detailed discussion of loss function and training. The main point that jumped out at me is that there are only 289 training images in the KITTI lane detection training set. So the network is basically relying on transfer learning from VGG.
It’s pretty amazing that any network can score at levels of 90%+ road accuracy, given a training set of only 289 images.
I’m also surprised that the 200,000 training steps don’t result in severe overfitting.
Summary
MultiNet seems like a really neat network, in that it accomplishes several tasks at once, really fast. The writeup is also pretty easy follow, so kudos to them for that.
If you’re so inclined, it might worth downloading the KITTI dataset and trying out some of this on your own.
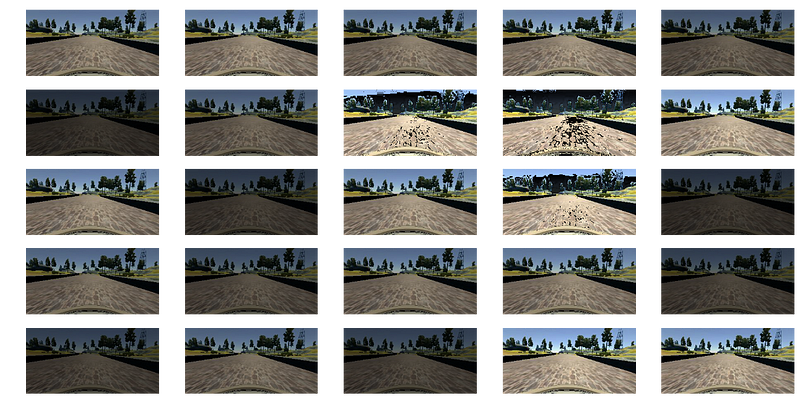
Jonathan’s post has a really nice walkthrough of his behavioral cloning project, including a visual explanation of the data pre-processing pipeline:
“Our data comes in as 160 x 320 x 3 RGB images. I used several preprocessing techniques to augment, transform, and create more data to give my network a better chance at generalizing to different track features.”
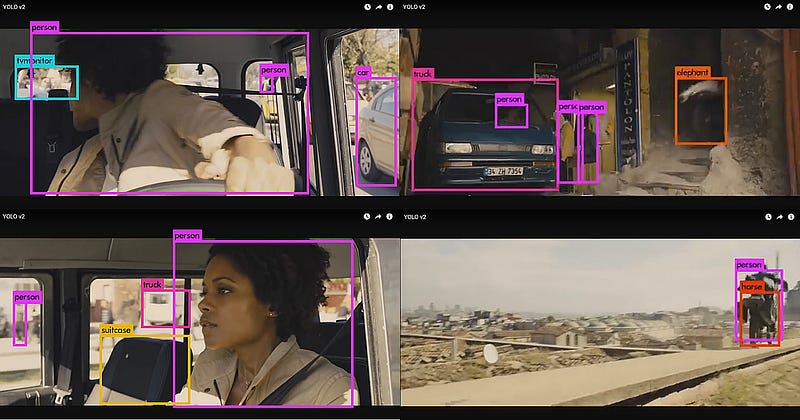
Kaspar has a terrific comparison of vehicle detection pipelines using standard computer vision, compared with a deep learning solution using YOLO:
“A forward pass of an entire image through the network is more expensive than extracting a feature vector of an image patch and passing it through an SVM. Hoever, this operation needs to be done exactly once for an entire image, as opposed to the roughly 150 times in the SVM+HOG approach. For generating the video above I did no performance optimization, like reducing the image or defining a region of interest, or even training specifically for cars. Nevertheless, YOLO is more than 20x faster than the SVM+HOG and at least as accurate.”
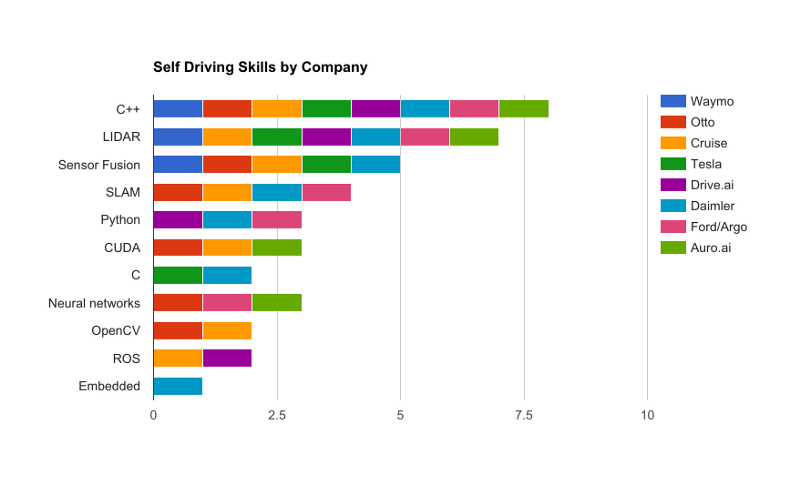
Caleb put together an awesome list of autonomous vehicle skills, and which companies are looking for them:
“The one constant in all of the postings is that experience with programming in C++ is a highly sought attribute for self-driving companies. Since performance is so vital for any code running on a real time system, it’s necessary to use a language that can be compiled to machine code for speed.”
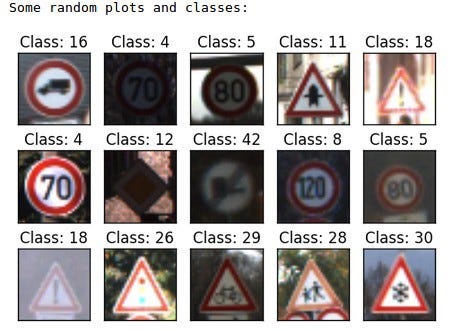
Machine versus human learning in traffic sign classification
Arnaldo has a fun comparison of how machine learning compares to human learning, specifically applied to the Traffic Sign Classifier Project:
“Overfit: the guy who has a perfect grade in school, in all subjects, but outside school knows nothing in real world. Or someone who has a phD in nuclear advanced theoretical gravitational quantum physics, but works as a waiter in a restaurant, because his knowledge is so specific it has no real world application.”
Andrew has a generous assessment of Term 1 of CarND:
““Amazing projects. Steep learning curve. Strong student community. Incredibly supportive and adaptive Udacity staff. Be prepared to commit 2–3 times estimated 10 hours per week to complete Term 1 successfully as projects encourage experimentation. Now to catch-up on sleep before the start of Term 2 on 24/Mar/2017.”
The program covers deep neural networks, convolutional neural networks, transfer learning, and other sophisticated topics. But some students want to go even beyond what we cover in the course.
Here are blog posts from three students who love neural networks and found their own ways to have fun with them.
Oliver dives into the guts of his desktop machine to figure out what components he needs to upgrade for a killer deep learning machine. He says to focus on the GB/s memory throughput of the GPU.
Here’s Oliver’s take on GPU options:
“Nvidia is betting big for Machine Learning with its CUDA parallel computing architecture and platform. Nothing against other manufacturers, but for ML, this is the one to go. Ignore the Quadro commercial line, to get good performance look for GTX 900 or higher. The recommendations I had were always for the GTX 1060 or higher.”
MiniFlow is a toy neural network library that my colleague Dom Luna built for the Udacity Self-Driving Car Program. We walk students through the code in order to teach them how neural networks work. Udacity student Peter Tempfli ported MiniFlow from Python to JavaScript!
Here’s what Peter learned:
“Every network has an optional point, where it returns the lowest error value. We want to move our input parameters to the direction of this optional point. Let’s model a function with a ‘valley’, and the current x,y point with the position of the ‘ball’. In order to move the ball to the lowest point of the ‘valley’, we need to adjust the w parameter in the direction of steepest line. The point here is that there is only one ‘best’ direction — this is the gradient for the given point.”
TensorFlow is the core deep learning library that students learn in the Udacity Self-Driving Car Program. It’s Google’s deep learning library, and it’s quickly taking over the machine learning world. Udacity student Krishna Sankar went to the latest TensorFlow Dev Summit, and reports back:
“The “Layers” layer makes it easier to construct models directly from neural network concepts without a lot of impedance. This is where Keras filled a vacuum.”
Here are five terrific posts by Udacity Self-Driving Car students covering advanced convolutional neural network architectures, how to set up AWS instances, and aspirations for CarND.
Alex took the basic convolutional neural network tools we teach in the program, and built on them to create a killer traffic sign classifier. He used extensive data augmentation, and an advanced network architecture with multi-scale feature extraction.
Basically with multi-scale features it’s up to classifier which level of abstraction to use, as it has access to outputs from all convolutional layers (e.g. features on all abstraction levels).
Sridhar has a fun summary of his experience in the program so far, including great detail about some sophisticated data augmentation and network architectures that he used. I also laughed when mentioned why he enrolled.
So then why did I choose this course over other available courses? “The main reason was that I have experience in ADAS so this course was a perfect fit for my career passion”. Also, it was like a monopoly.
Subhash has clear and concise descriptions of the computer vision tools he uses for his Finding Lane Lines Project. A bonus section includes him trying to find lanes on roads in India!
The part remaining is to discover lines in the edge pixels. Before attempting this, we need to rethink a point in terms of all the lines that can possibly run through it. Two points will then have their own sets of possible lines with one common line that runs through both of them. If we could plot the line-possibilities of these two points, both points will “vote” for that line that passes through both of them.
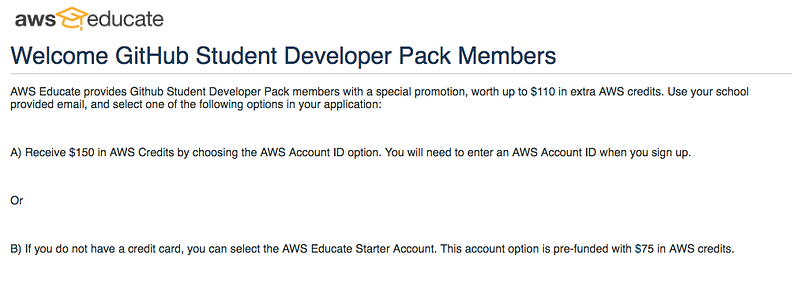
Himanshu has a great tutorial on how to set up an AWS EC2 instance with a GPU to accelerate deep learning. It includes tips on how to get free AWS credits! (I should note that since Himanshu wrote this we have included our own tutorial within the program, but this is still a great post and more free credits are always welcome!)
I will be helping you out in the following setup * AWS Account setup and $150 Student Credits. * Tensorflow-GPU setup with all other libraries.
Mojtaba joins us from Iran, which is really inspiring given the backdrop of world events right now. We are excited to have him and he is excited to be in the program!
Maybe Sebastian Thrun has no idea who am I and how much respect I have for him. I made a autonomous vehicle because I saw his course (Artificial Intelligence for Robotics), I learned a lot from him and the power of ROS (Robot Operating System). I really love this field of study and I follow everything related to autonomous vehicles since 2004 (When DARPA started everything). And now I am in the first Cohort in the Self Driving Cars Nano Degree (SDCND) thanks to David Silver, Todd Gore, Oliver Cameron, Stuart Frye and other Udacians.
Data is the key to deep learning, and machine learning generally.
In fact, Stanford professor and machine learning guru (and Coursera founder, and Baidu Chief Scientist, and…) Andrew Ng says that it’s not the engineer with the best machine learning model that wins, rather it’s whoever has the most data.
One way to get a lot of data is to painstakingly collect a lot of it. All else equal, this is the best way to compile a huge machine learning dataset.
But all else is rarely equal, and compiling a big dataset is often prohibitively expensive.
Enter data augmentation.
The idea behind data augmentation (or image augmentation, when the data consists of images) is that an engineer can start with a relatively small data set, make lots of copies, and then perform interesting transformations on those copies. The end result will be a really large dataset.
TensorFlow is the main deep learning library we are using in the Udacity Self-Driving Car Engineer Nanodegree Program, and it’s been a little bit painful because of the lack of Windows support.
We’ve had to work with our Windows users to set up Docker containers in which to run TensorFlow, and frankly we haven’t done as good a job with that as we should.