Somehow this story slipped past me last October, but apparently Uber circulated a whitepaper outlining their plane to bring personal VTOL (vertical take-off and landing) aircraft to the masses.
The whitepaper itself is 97 pages long, but a more concise summary is on their Medium channel.
Uber outlines eleven major challenges for bringing VTOL to market at scale:
After talking with students about the CarND projects, we have split projects into code and writeup reports.
For every project in the first term of the program, the code implementation and the writeup report will be in separate files.
We hope this change makes it is easier first to focus on implementing the project, and then to explain the implementation.
Each project has a GitHub repository, and each repository contains a writeup template to structure your explanation. The templates are based on the project rubrics, which should make it easier to pass the project on the first submission!
There are additional small changes to the Traffic Sign Classifier Project and the Behavioral Cloning Project.
For each project in the first term, a writeup report must be included in the submission, in addition to any other required code files. The report can either be a Markdown or PDF file. Check out the new Project Expectations content. Rubrics have been updated to reflect the writeup report requirement.
The Traffic Signs Project now comes with a validation set. It is no longer necessary to split the training data to create a validation set.
The Traffic Signs Project has had some small rubric clarifications, so be sure to check the rubric.
In the Behavioral Cloning Project, previously the model was saved as a JSON file and the weights were saved as an H5 file. In the new version, the model and weights should be saved together into one H5 file. The project includes instructions on how to do this.
Please let us know if you have any questions about these changes.
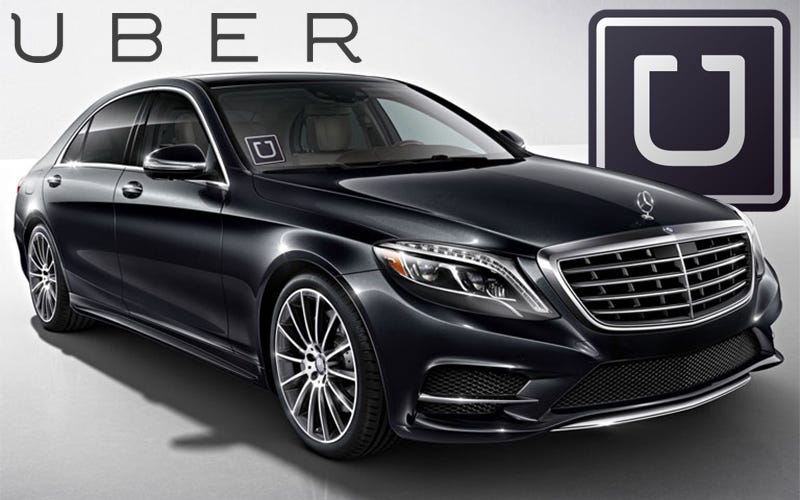
According to the press release by Uber CEO Travis Kalanick:
In the coming years, Daimler has planned to introduce and operate their own self-driving cars on Uber’s ridesharing network.
This is a new and interesting business model that is a little different than what I’ve seen before.
There has been speculation that some automotive manufacturers like Tesla might launch their own mobility services and compete directly with Uber. And there has been speculation that tech companies like Google might manufacture their own vehicles.
In this case, Mercedes-Benz is still manufacturing the vehicles, and they are retaining ownership, but they are deploying them on Uber’s network.
This might be a way for Mercedes-Benz to learn about ride-sharing from Uber, and for Uber to learn about automotive manufacturing from Mercedes-Benz.
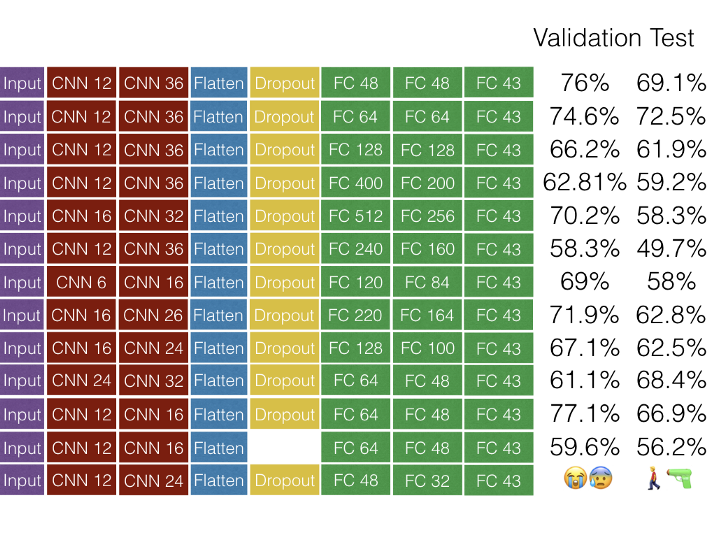
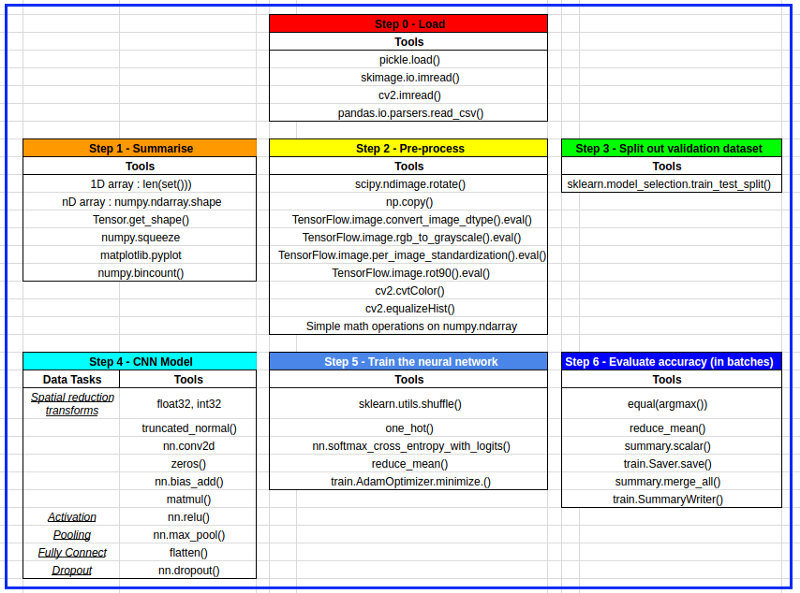
Andrew has lots of images in this blog post, including a spreadsheet of all the different functions he used in building his Traffic Sign Classifier with TensorFlow!
I got to explore TensorFlow and various libraries (see table below), different convolutional neural network models, pre-processing images, manipulating n-dimensional arrays and learning how to display results.
In this post, Param goes step-by-step through his iterative process of finding the right combination of pre-processing, augmentation, and network architecture for classifying traffic signs. 54 neural network architectures in all!
I went crazy by this point, nothing I would do would push me into the 90% range. I wanted to cry. A basic linearly connected model was giving me 85% and here I am using the latest hotness of convolution layers and not able to match.
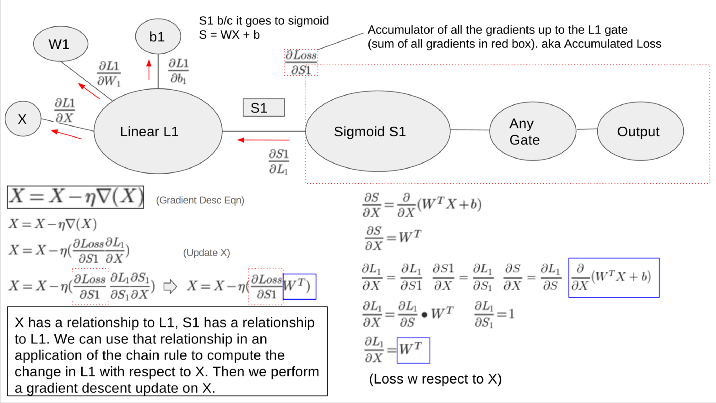
Backpropagation is the most difficult and mind-bending concept to understand about deep neural networks. After backpropagation, everything else is a piece of cake. In this concise post, Jonathan takes a crack and summarizing backpropagation in a few paragraphs.
When we are training a neural network we need to figure out how to alter a parameter to minimize the cost/loss. The first step is to find out what effect that parameter has on the loss. Then find the total loss up to that parameters point and perform the gradient descent update equation to that parameter.
Arnaldo presents a number of lessons he learned while designing an end-to-end network for driving in the Behavioral Cloning Project. In particular, he came to appreciate the power of GPUSs.
Using GPU is magic. Is like to give a Coke to someone in the desert. Or to buy a new car — the feeling of ‘how I was using that crap old one’. Or to find a shortcut in the route to the office: you’ll never use the long route again. Or to find a secret code in a game that give superpowers…
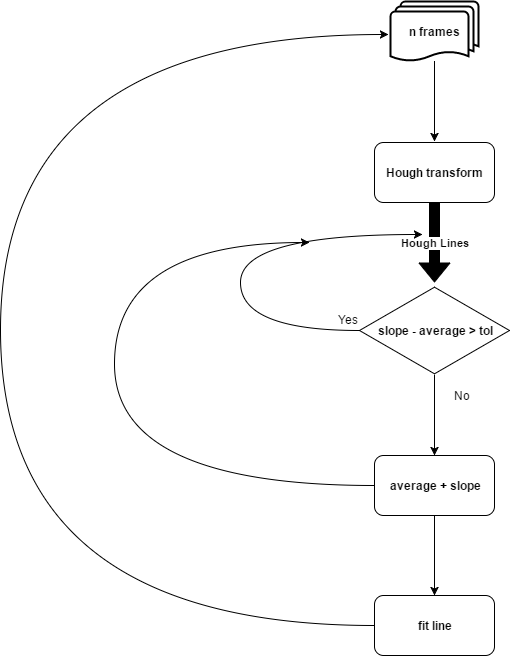
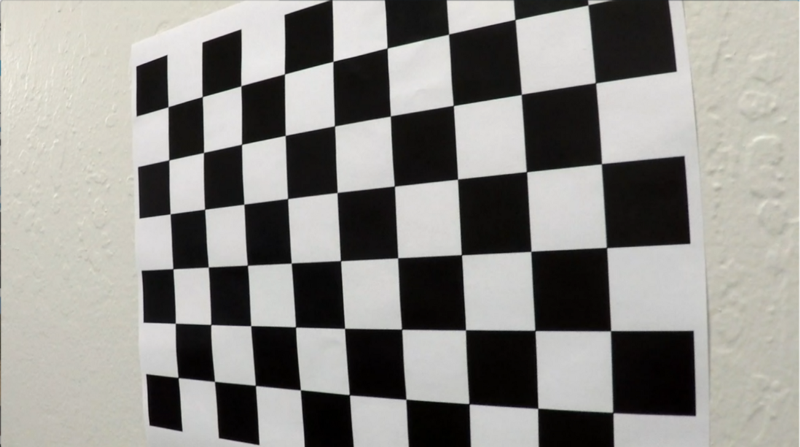
Esmat presents a well-organized outline of his Finding Lane Lines Porject and the computer vision pipeline that he used. In particular, he has a nice explanation of the Hough transform, which is a tricky concept!
The probabilistic Hough line transform more efficient implementation of Hough transform. It gives as output the extremes of the detected lines (x0, y0, x1, y1). It is difficult to detect straight lines which are part of a curve because they are very very small. For detecting such lines it is important to properly set all the parameters of Hough transform. Two of most important parameters are: Hough votes and maximum distance between points which are to be joined to make a line. Both parameters are set at their minimum value.
Students in Udacity’s Self-Driving Car Engineer Nanodegree Program go above and beyond to build terrific implementations of vehicle detectors, lane line detectors, neural networks for end-to-end learning, and career advice.
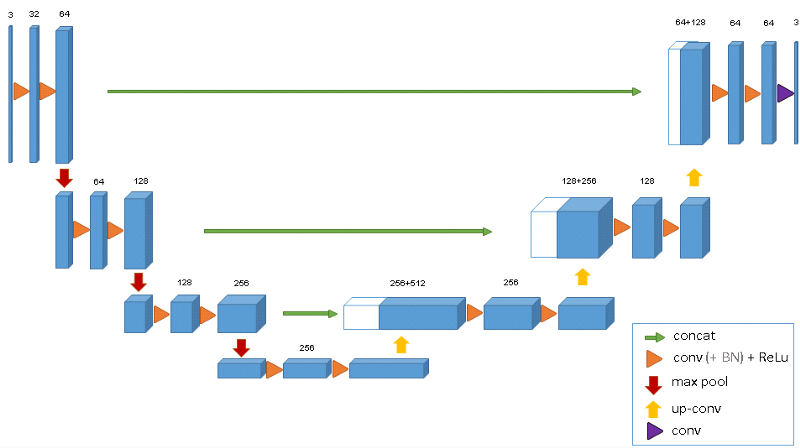
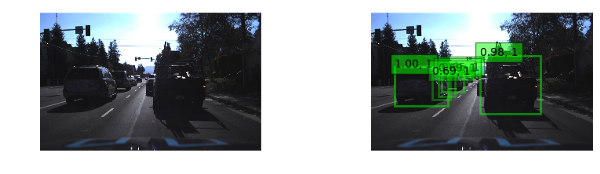
In the Vehicle Detection Project, students use standard computer vision methods to detect and localize vehicles in images taken from highway driving. Vivek went well beyond standard computer vision methods, and used U-Net, an encoder-decoder architecture that has proven effective for medical imaging. The results are astounding.
Another advantage of using a U-net is that it does not have any fully connected layers, therefore has no restriction on the size of the input image. This feature allows us to extract features from images of different sizes, which is an attractive attribute for applying deep learning to high fidelity biomedical imaging data. The ability of U-net to work with very little data and no specific requirement on input image size make it a strong candidate for image segmentation tasks.
Param provides a great walkthrough of his first project — Finding Lane Lines. He also includes a video that shows all of the intermediate steps necessary to find lane lines on the road. Then he applies his computer vision pipeline to a new set of videos!
This is the most important step, we use the Hough Transform to convert the pixel dots that were detected as edges into meaningful lines. It takes a bunch of parameters, including how straight should a line be to be considered a line and what should be the minimum length of the lines. It will also connect consecutive lines for us, is we specify the maximum gap that is allowed. This is a key parameter for us to be able to join a dashed lane into a single detected lane line.
Leading up to the Finding Lane Lines project, we teach students about some important computer vision functions for extracting lines from images. These are tools like Hough transforms and Canny edge detection. However, we leave it to the students to actually identify which lines correspond to the lane lines. Most students find some points and extrapolate y=mx+b. Peteris went beyond this, though, and taught himself how to use the numpy.polyfit() function in order to identify the line equation automatically!
If return to the original question, how do we extrapolate the lines?
Since we got a straight line, we can simply plug in points that are outside of our data set.
While training his end-to-end driving network for the Behavioral Cloning project, Vivek made us of extensive image augmentation. He flipped his images, resized them, added shadows, changed the brightness, and applied vertical and horizontal shifts. All of this allowed his model to generalize to an entirely new track that it had never seen before.
This was perhaps the weirdest project I did. This project challenged all the previous knowledge I had about deep learning. In general large epoch size and training with more data results in better performance, but in this case any time I got beyond 10 epochs, the car simply drove off the track. Although all the image augmentation and tweaks seem reasonable n0w, I did not think of them apriori.
Miguel’s practical post covers some of the different angles from which a self-driving car engineer might need to know C++, ROS, and other autonomous vehicle development tools. It’s a great read if you’re looking for a job in the industry!
Self-Driving Car Engineers use C/C++ to squeeze as much speed out of the machine as possible. Remember, all processing in autonomous vehicles is done in real-time and even sometimes in parallel architectures, so you will have to learn to code for the CPU but also the GPU. It is vital for you to deliver software that can process large amount of images (think about the common fps — 15, 30 or even 60) every second.
Here are five terrific posts by Udacity Self-Driving Car students covering advanced convolutional neural network architectures, how to set up AWS instances, and aspirations for CarND.
Alex took the basic convolutional neural network tools we teach in the program, and built on them to create a killer traffic sign classifier. He used extensive data augmentation, and an advanced network architecture with multi-scale feature extraction.
Basically with multi-scale features it’s up to classifier which level of abstraction to use, as it has access to outputs from all convolutional layers (e.g. features on all abstraction levels).
Sridhar has a fun summary of his experience in the program so far, including great detail about some sophisticated data augmentation and network architectures that he used. I also laughed when mentioned why he enrolled.
So then why did I choose this course over other available courses? “The main reason was that I have experience in ADAS so this course was a perfect fit for my career passion”. Also, it was like a monopoly.
Subhash has clear and concise descriptions of the computer vision tools he uses for his Finding Lane Lines Project. A bonus section includes him trying to find lanes on roads in India!
The part remaining is to discover lines in the edge pixels. Before attempting this, we need to rethink a point in terms of all the lines that can possibly run through it. Two points will then have their own sets of possible lines with one common line that runs through both of them. If we could plot the line-possibilities of these two points, both points will “vote” for that line that passes through both of them.
Himanshu has a great tutorial on how to set up an AWS EC2 instance with a GPU to accelerate deep learning. It includes tips on how to get free AWS credits! (I should note that since Himanshu wrote this we have included our own tutorial within the program, but this is still a great post and more free credits are always welcome!)
I will be helping you out in the following setup * AWS Account setup and $150 Student Credits. * Tensorflow-GPU setup with all other libraries.
Mojtaba joins us from Iran, which is really inspiring given the backdrop of world events right now. We are excited to have him and he is excited to be in the program!
Maybe Sebastian Thrun has no idea who am I and how much respect I have for him. I made a autonomous vehicle because I saw his course (Artificial Intelligence for Robotics), I learned a lot from him and the power of ROS (Robot Operating System). I really love this field of study and I follow everything related to autonomous vehicles since 2004 (When DARPA started everything). And now I am in the first Cohort in the Self Driving Cars Nano Degree (SDCND) thanks to David Silver, Todd Gore, Oliver Cameron, Stuart Frye and other Udacians.
They cover the waterfront — from debugging computer vision algorithms, to detecting radius of curvature on the road, to using Faster-RCNN, YOLO, and other cutting edge network architectures.
Jessica has a fun post analyzing some of the bugs she had to fix during her first project — Finding Lane Lines. Click through to see why the lines above are rotated 90 degrees!
Here I want to share what I did to investigate the bug. I printed the coordinates of the points my algorithm used to extrapolate the linens and plotted them separately. This was to check whether the problem was in the points or in the way the points were extrapolated into a line. E.g.: did I just throw away many of the useful points because they didn’t pass my test?
Vivek has gone above and beyond the minimum requirements in almost every area of the Self-Driving Car program, including helping students on the forums and in our Slack community, and in terms of his project submissions. He really outdid himself with this post, which compares using several different cutting-edge neural network architectures for vehicle detection.
The final architecture, and the title of this post is called the Single Shot Multibox Detector (SSD). SSD addresses the low resolution issue in YOLO by making predictions based on feature maps taken at different stages of the convolutional network, it is as accurate and in some cases more accurate than the state-of-the-art faster-RCNN. As the layers closer to the image have higher resolution. To keep the number of bounding boxes manageable an atrous convolutional layer was proposed. Atrous convolutional layers are inspired by “algorithme a trous” in wavelet signal processing, where blank filters are applied to subsample the data for faster calculations.
This is a fantastic post by Chris comparing and contrasting the performance of two different CNN architectures for end-to-end driving. Chris looked at an average-sized CNN architecture proposed by NVIDIA, and a huge, VGG-style architecture he built himself.
I experimented with various data pre-processing techniques, 7 different data augmentation methods and varied the dropout of each of the two models that I tested. In the end I found that while the VGG style model drove slightly smoother, it took more hyperparameter tuning to get there. NVIDIA’s architecture did a better job generalizing to the test Track (Track2) with less effort.
Josh Pierro took his lane-finding algorithm for a spin in his 1986 Mercedes-Benz!
From the moment I started project 1 (p1 — finding lane lines on the road) all I wanted to do was hook up a web cam and pump a live stream through my pipeline as I was driving down the road.
So, I gave it a shot and it was actually quite easy. With a PyCharm port of P1, cv2 (open cv) and a cheap web cam I was able to pipe a live stream through my model!
Paul does a great job laying out his computer vision pipeline for detecting lane lines on a curving road. He even compares his findings for radius of curvature to US Department of Transportation standards!
Daniel has devoted a section of his blog to the Self-Driving Car projects, including applying his lane-line finder to video he took himself!
The first project for the Udacity Self-Driving Car Nanodegree was to create a software pipeline capable of detecting the lane lines in video feed. The project was done using python with the bulk of work being performed using the OpenCV library. The video to the side shows the software pipeline I developed in action using video footage I took myself.
Jessica’s post discusses the need to normalize image data before feeding it into a neural network, including a bonus explainer on the differences between normalization and standardization.
The same range of values for each of the inputs to the neural network can guarantee stable convergence of weights and biases. (Source: Mahmoud Omid on ResearchGate)
Suppose we have one image that’s really dark (almost all black) and one that’s really bright (almost all white). Our model has to address both cases using the same parameters (weights and biases). It’s hard for our model to be accurate and generalise well if it has to tackle both extreme cases.
Dylan is a student in both the Georgia Tech Online Master’s in Computer Science Program (run by Udacity) and also in CarND. He’s also turning his own Subaru into a self-driving car! (Note: We do not recommend this.)
Below I’ve put together a list of purchases needed for this project. There will definitely be more items coming soon, at least a decent power supply or UPS. Thankfully, this list covers all the big-ticket items.
Jetson TX1 Developement Kit (with .edu discount) NVIDIA $299 ZED Stereo Camera with 6-axis pose Stereolabs $449 CAN(-FD) to USB interface PEAK-System $299 Touch display, 10.1” Toguard $139 Wireless keyboard K400 Logitech $30 Total $1216
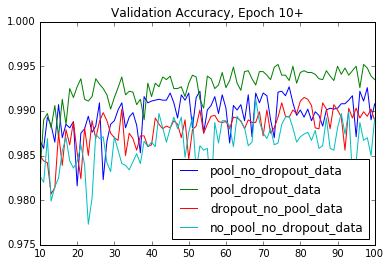
Another post by Jessica Yung! This time, she runs experiments on her model by training with and without different layers, to see which version of the model generalizes best.
Means of training accuracy - validation accuracy in epochs 80-100 (lower gap first):
Pooling and dropout (0.0009) Dropout but no pooling (0.0061) Pooling but no dropout (0.0069) No pooling or dropout (0.0094)
I’ve spent the past several days highlighting posts from Udacity Self-Driving Car students in areas related to computer vision, neural networks, careers, and more.
I’ll be doing more of that today, and for the next several days. Then we’ll return to our regularly scheduled programming, although I expect to periodically include more student posts each week.
Subodh summarizes his approach to building an end-to-end network for driving. He was even able to get his network to drive the car on a track it had never seen before!
The true test of a neural network is how well it performs on unseen data i.e. data not used in training. To evaluate this the simulator had a second track which was very different from the one used for training. It was darker, had slopes while the first track was more or less flat, had sharper turns and more right turns as compared to the first track. The network had never seen data from this track. However some of these differences were accounted for in the network due to image augmentation techniques described above.
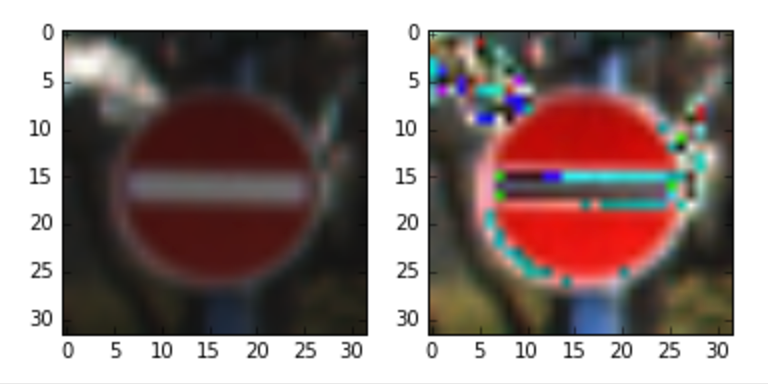
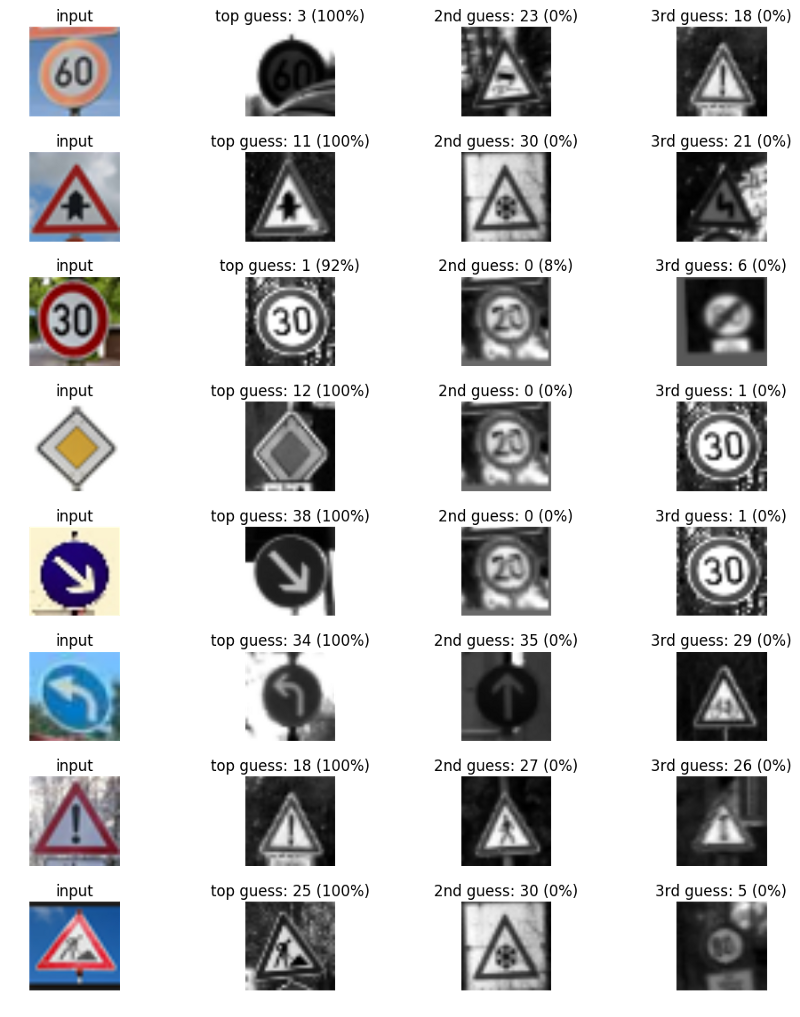
Jeremy exploited some pretty cool data augmentation techniques to help his traffic sign classifier generalize better. As a consequence, his model was able to correctly classify many different images that he found on the Internet.
Wait… a hundred percent? Seriously? I don’t know how this model can be that sure of its prediction. Granted, I gave it some real softballs, there. But still, I would have expected them all to be in the 75–90% range. Whatever — I’ll take it! Good job, model!
Andrew has a running journal documenting his journey through CarND. In this post, he provides great notes about the deep learning content the course provides in the run-up to the Traffic Sign Classifier Project.
Hi. Dived into part 1 of Deep Learning during the last 2 weeks. The course covered a lot of material over 7 lessons, defined with succinct, well commented, executable code … just how I like it!
Param built a neural network to classify traffic signs and in the process, spent a lot of time thinking about how to size the network, preprocess the images, and tune hyperparameters.
Or, how I struggled with Project 2: Traffic Sign Classfication as part of the Self-driving Car Engineering Nanodegree from Udacity. In the end, the struggle taught me more than the results I got.
One of the big challenges when we launched the program was helping to get everybody’s software packages working. We finally published the Udacity CarND Starter Kit, but we also rely on students like Youcef to help their fellow students by guiding them on setup.
In this post maunesh discusses the challenges of tuning parameters in computer vision algorithms, specifically using the OpenCV library. maunesh built a GUI for parameter tuning, to help him develop intuition for the effect of each parameter. He published the GUI to GitHub so other students can use it, too!
For Canny edge detection algorithm to work well, we need to tune 3 main parameters — kernel size of the Gaussian Filter, the upper bound and the lower bound for Hysteresis Thresholding. More info on this can be found here. Using a GUI tool, I am trying to determine the best values of these parameters that I should use for my input.
In this post, Mojtaba walks through the development of his behavioral cloning model in detail. I particularly like the graphs he built to visualize the data set and figure out which approaches would be most promising for data augmentation.
Always the first step to train a model for an specific dataset is visualizing the dataset itself. There are many visualization techniques that can be used but I chose the most straightforward option here.
Galen explains his image processing pipeline for the first project of the program — Finding Lane Lines — really clearly. In particular, he has a admirably practical explanation of Hough space.
Pixels are considered points in XY space
hough_lines() transforms these points into lines inside of Hough space
Wherever these lines intersect, there is a point of intersection in Hough space
The point of intersection corresponds to a line in XY space
This is a great post for anybody interested in learning about self-driving cars, but concerned they might not be up to the challenge.
I’ll put the summary right up top — if I can do it, you can too. I wanted to share this post to show some of the work I’m doing with Udacity’s Self-Driving Car Nanodegree, and I also want to share some of my back story to show you that if I can do it, there’s nothing stopping you. The only thing that got me to this point is consistent, sustained effort.
Mengxi wasn’t satisfied training a convolutional neural network that successfully learns end-to-end driving in the Udacity simulator. He systematically removed layers from his network and pre-processed the images until he was able to drive the simulated car with a tiny network of only 63 parameters!
I tried the gray scale converted directly from RGB, but the car has some problem at the first turn after the bridge. In that turn, a large portion of the road has no curb and the car goes straight through that opening to the dirt. This behavior seems to related to that fact that the road is almost indistinguishable from the dirt in grayscale. I then look into other color space, and find that the road and the dirt can be separated more clearly in the S channel of the HSV color space.